Posts mit dem Label Lawn Fawn werden angezeigt. Alle Posts anzeigen

Charge Me Uo: Light Up Card Making Kit - Lawn Fawn and Chibitronics

Hello crafty friends, 

I´m so really happy to be part of this amazing collaboration between Chibitronics and Lawn Fawn! They teamed to create a kit that includes everything for two interactive cards. Templates, stamp set, coordinating dies, LEDs, coppertape, batteries, as well as patterned paper to create kind of card you want. 

Charge Me Up: Light Up Card Making Kit with Lawn Fawn

 The idea for my card came definitely from the stamp set. The circuit is pretty simple to create, especially when you have the great templates that my friend Eiko from the Chibitronics design team created for you. I wanted the background to match with the set, so I had the idea to use the copper tape to create the fancy background. 

In case you are interested in how I created my card, there is a full video tutorial over on my YouTube channel. 


This was it for today. Please don't forget to watch all the creations from the Chibitronics and Lawn Fawn design team. There are some great samples!

Lawn Fawn is also giving away one Kit each day of the hop. Head over there to read more about the conditions!

I hope you enjoyed the charge me up kit with Lawn Fawn and until the next time I hope you have a wonderful day. 


Here are the links for supplies I've used. Some of the links are affiliate links. They provide a little commission in case you buy products using my links with no extra costs for you. Products marked with (*) I generously received from the companies to use. 


Lawn Fawn and ChibitronicsCharge me up cardmaking kit 
BatterieBatterie
Chibitronics Cuppertape
Chibitronics LED white
Chibitronics Starter Kit
Copic MarkerCopic Marker
EK SuccessPowder Tool
Fiskars Schneidebrett
Foam Tape3M
FoliaBastelskalpell
FoliaPapier Schwarz
IncadincadoEmbossing Bag
MementoTuxedo Black
Neenah SolarWhite Paper Ultra Heavy
RangerGlossy Accents
RangerMulti Matte Medium
Scotch 3MTape Glider
SizzixBigShot
Spectrum Noir SparklesClear Overlay
Tim HoltzInk Blending Tool
VersamarkWatermark Ink
WOW EmbossingOpaque White Embossing Powder
Tonic Trimmer


Home is where the heart is

Hello crafty friends and happy Sunday!

Today I'm here to share with you another pull tab slider switch card. For long time I wanted to use the happy village stamp set. And now I had a good reason. Near to our house we occasionally saw a house that was left. We are searching for two years already to find a house that we a) can pay and b) is more or less what we want. I decided to create a card and ask the owner if he/she would sell. Until now, I didn't send the card :D


As always I created a video tutorialfor you guys.
But here I will do a little instruction:


  • Stamp all images on Neenah solar white paper using Memento Tuxedo Black Ink and color with Copic Markers.
  • Die cut images using coordinating dies and cut out the little heart in the house using a craft knife.
  • Die cut all pieces needed. Card panel and  hill borders.
  • I placed all pieces like I wanted them so I knew where to put my light.
  • I created my simple circuit first. REMINDER: + side from the battery connects with the plus side from the LED. And so does the minus side ;)
  • Then I cut out a stripe into the Circuit. I created a "X" shaped paper piece folding the paper forward and backwards. The piece was covered with copper tape.
  • The X has to be put in the cut out stripe. Two arms from the "X" under the panel and two on top. When the X is, where the copper tape is, then the circuit is connected again.
  • Glue a pull tab on top of the X.
  • Circuit panel can now be taped to the card base and the card can be assembled.
  • As I always like to hide the thickness of the card, my sky layer has one layer of foam tape, the first hill layer has two layers of foam tape and the third hill layer has three layers of foam tape.
  • Add all the houses, clouds and fences and trees.
  • On my pull tab I added a green piece of paper, so the recipient would know easier where to pull. I wrote in german "pull here", as the recipient may just know german.
  • Stamp the sentiment. Please stamp the sentiment before assembling the card. I changed my mind and did it last. But I wouldn't recommend this ;)
  • Card is all done.

This was my card for today. I hope I manage to send the card to the house owner. We are just waiting to talk to the neighbors, so we know better about the situation. We don't want to annoy anyone.
I hope you enjoyed my tutorial and I hope to see you back soon! Happy Sunday

Vanessa

Here are the links for supplies I've used. Some of the links are affiliate links. They provide a little commission in case you buy products using my links with no extra costs for you. Products marked with (*) I generously received from the companies to use.
BatterieBatterie
ChibitronicsCuppertape
ChibitronicsLED white
ChibitronicsStarter Kit
Copic MarkerCopic Marker
Create a SmileAcrylblöcke
Foam Tape3M
FoliaBastelskalpell
FoliaBonefolder
MementoTuxedo Black
My Favorite ThingsStitched Rectangle Scallop Frame
My Favorite ThingsStitched Snow Drifts
My Sweet PetuniaMISTI Tool
Neenah SolarWhite Paper Ultra Heavy
Scotch 3MTape Glider
SizzixBigShot
Tim HoltzBroken China
Tim HoltzInk Blending Tool
Tim HoltzTumbled Glass Ink
Tim HoltzTwisted Citron
TombowMono Multi 
VersafineOnyx Black


Interactive Switch LED Card

Hello friends,
today I have this interactive switch system to share with you. For long time I wanted to create a card in which you can open the oven and then the light would shine. It took me a bit, but finally I can share with you how I did it.


Basicly the circuit is a simple circuit. The circuit is all time closed. The little acetate piece which is glued behind the ovens door is there to interrupt the circuit. This is all you have to know. So the light is only shining while the ovens door is open.


As always I created a >>video<<tutorial for you, so you can easily recreate the card.


I hope you enjoyed my card for today. Soon this month I will be back with another tutorial for you. I wish you a great Sunday.

Vanessa

Here are the links for supplies I've used. Some of the links are affiliate links. They provide a little commission in case you buy products using my links with no extra costs for you. Products marked with (*) I generously received from the companies to use.
Tonic Trimmer
Abstandklebeband TransparentAbstandklebeband Transparent
BatterieBatterie
ChibitronicsCuppertape
ChibitronicsStarter Kit
ChibitronicsPink, Orange, Green LED*
Copic MarkerCopic Marker
Create a SmileAcrylblöcke
Foam Tape3M
FoliaAcrylblöcke
FoliaBastelskalpell
FoliaBonefolder
FoliaSchere
FoliaVellum
Lawn FawnPush Here
Lawn FawnSprinkled with joy
Lawn FawnBun in the oven
MementoTuxedo Black
Neenah SolarWhite Paper Ultra Heavy
Scotch 3MTape Glider
Spectrum Noir SparklesClear Overlay
TombowMono Multi 
VersafineOnyx Black

Wish Big

Hello friends, 

today I have a new card to share with you. I created this shaker light up card using some Lawn Fawn stamps and the Chibitronics light up kit.


As always I prepared a video tutorial for you guys, as I'm not that good in explaining in written english. 

I hope you enjoyed my project for today and I wish you all a great weekend.


Here are the links for supplies I've used. Some of the links are affiliate links. They provide a little commission in case you buy products using my links with no extra costs for you. Products marked with (*) I generously received from the companies to use. 

Batterie Batterie
Chibitronics  Cuppertape
Chibitronics  LED white
Chibitronics  Starter Kit
Copic Marker Copic Marker
Fiskars  Schneidebrett
Foam Tape 3M
Lawn Fawn Push Here
Lawn Fawn Elphie Selfi
Lawn Fawn Elphie Selfi Dies
Memento Tuxedo Black
My Favorite Things  Wonky Stitched Rectangle
Neenah Solar White Paper Ultra Heavy
Pretty Pink posh Sparkling Clear 4mm
Pretty Pink posh Sparkling Clear 6mm
Pretty Pink posh Sparkling Clear Seed Beads
Scotch 3M Tape Glider
Sizzix BigShot
Spectrum Noir Sparkles Clear Overlay
Tim Holtz Broken China
Tim Holtz Twisted Citron
Tim Holtz Ink Blending Tool
Tim Holtz Tonic Trimmer
Tim Holtz Tumbled Glass Ink
Tim Holtz Twisted Citron Distress Oxide
Tim Holtz Broken China Distress Oxide
Tombow Mono Multi 


Weihnachtskarte mit Geld-/Gutscheinfach

Hallo ihr Lieben,

heute möchte ich euch mal eine Idee zeigen, wie ihr Geld oder Gutscheine in den Karten verstecken könnt. Ich finde diese Idee super, zumal das Geschenk nicht auf dem 1. Blick ersichtlich ist.


Ich habe zuerst alle meine Figuren gestempelt und mit meinen Copic Markern angemalt. Nachdem ich fertig war, habe ich in den Ofen drei Seiten eingeschnitten. Dazu habe ich mein Bastelskalpell verwendet. Anschließend habe ich alles ausgeschnitten. Da ich zur Weihnachtszeit sehr viel bastel verwende ich für so etwas gerne meine Silhouette Portrait.

Jedenfalls habe ich anschließend aus meinem Kartenaufleger ein Quadrat ausgestanzt. Den Holzboden habe ich selbst gestaltet, in dem ich mit Distress Inks und Oxide Inks einen Papierstreifen eingefärbt habe und mit einem Holzmuster bestempelt habe. Die Wand habe ich mit einem selbsterstellten Stencil und Embossing Paste erstellt. Auf den Kartenaufleger kommt jetzt noch ein Spruch drauf. Im Prinzip habe ich nun die Kartenfront gestaltet, damit ich dann auf der Rückseite mit Fach für Gutscheine und Geld erstellen konnte. Eigentlich ist es nur eine Tasche, die ich mit Foamtape mache. Klar könnte man die Innenseite von dem Ofen noch "perfekter" gestalten, aber ich fand es nicht wichtig, da die Käufer und Beschenkten nur auf diesen Öffnungseffekt achten und nicht, ob alles wirklich genau so ist, wie es in echt wäre.


Ich hoffe euch hat meine Inspiration für heute gefallen und wir sehen uns ganz bald wieder. Eine kurze Information. Zu Weihnachten bastel ich Unmengen an Karten, zumal ich dieses Jahr auch auf dem Branshardter Weihnachtsmarkt ausstelle. Leider bleibt mir deshalb nicht wirklich Zeit zu posten und irgendwie eine Christmas Card Series zu machen. Das Tut mir unheimlich leid. Ich hoffe ihr erfreut euch aber trotzdem über die Projekte, obwohl ihr nicht wisst wann wieder gepostet wird. 


SUPPLIES/MATERIAL:

Here are the links for supplies I've used. Some of the links are affiliate links. They provide a little commission in case you buy products using my links with no extra costs for you. Products marked with (*) I generously received from the companies to use. 

Copic Marker Copic Marker
Create a Smile Zum Feste das Beste
Fiskars  Schneidebrett
Foam Tape 3M
Lawn Fawn Sprinkled with joy
Memento Tuxedo Black
My Favorite Things Zig Zag Squares
Neenah Solar White Paper Ultra Heavy
Ranger Glossy Accents
Scotch 3M Tape Glider
Silhouette Portrait Plotter
Simon Says Stamp Fog Ink
Sizzix BigShot
Tim Holtz Antique Linen
Tim Holtz Ink Blending Tool
Tim Holtz Tonic Trimmer
Tombow Mono Multi 

Reach For The Stars- LED CARD

Hello crafty people,

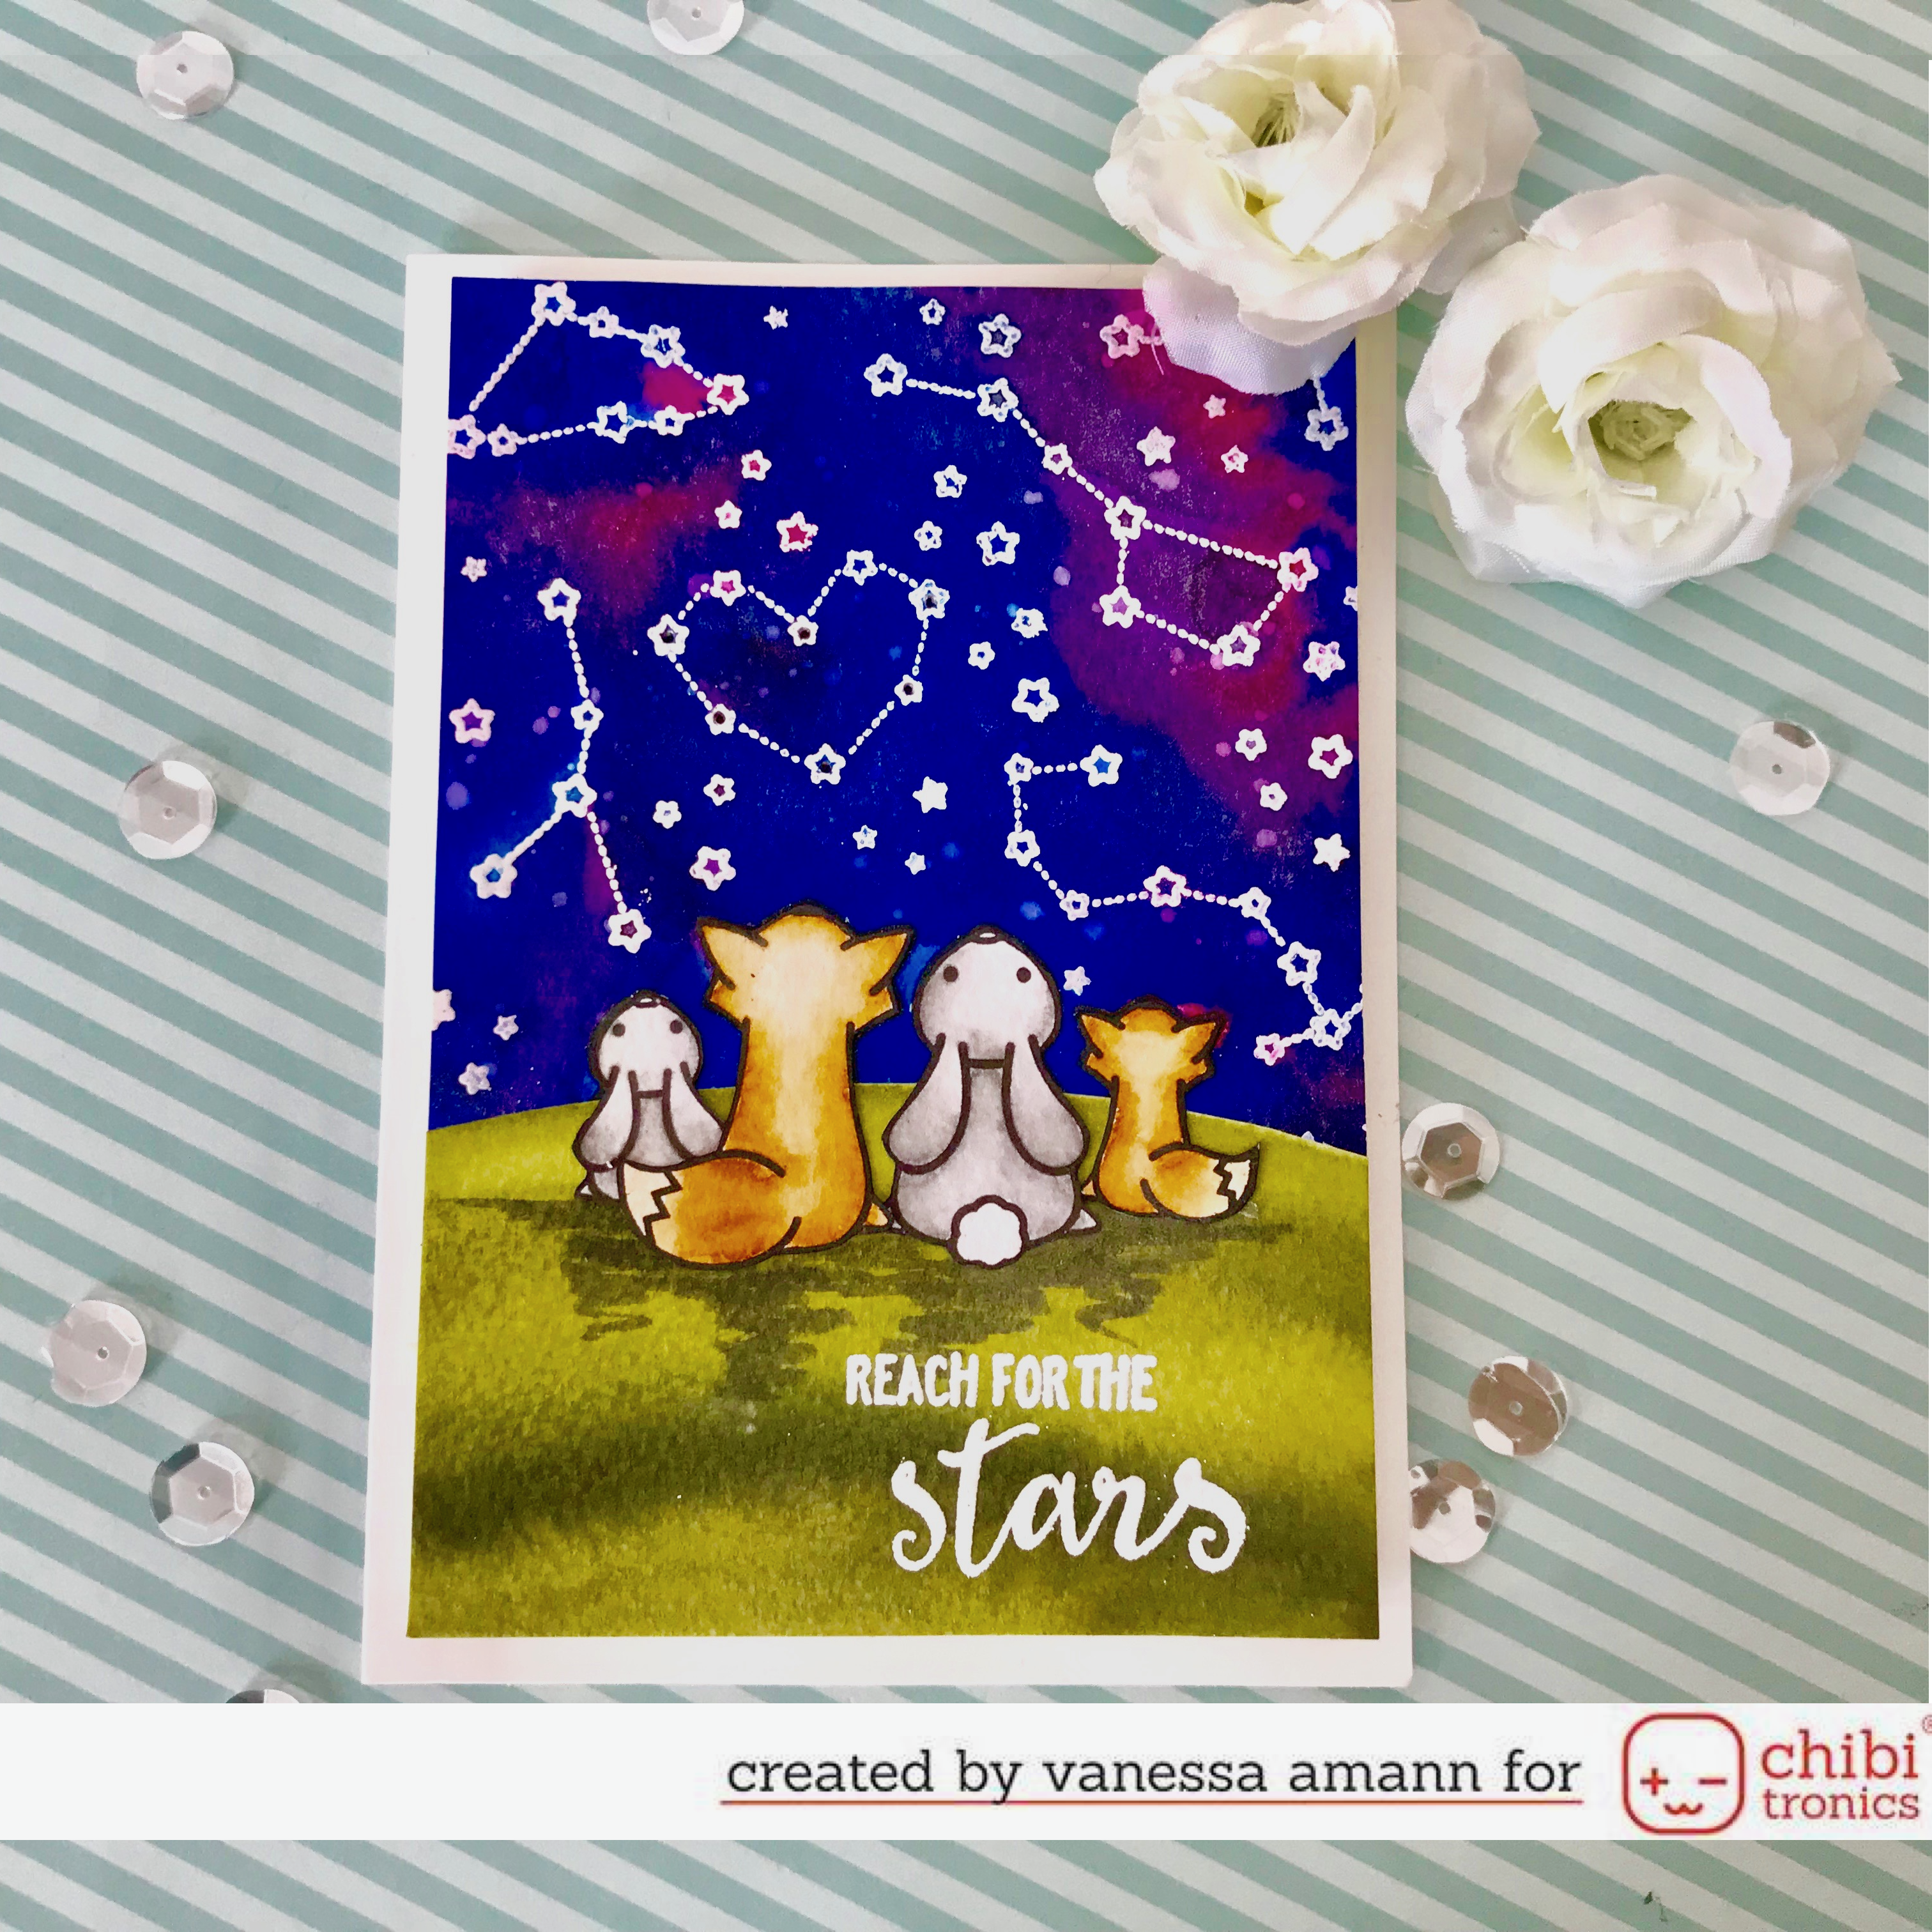
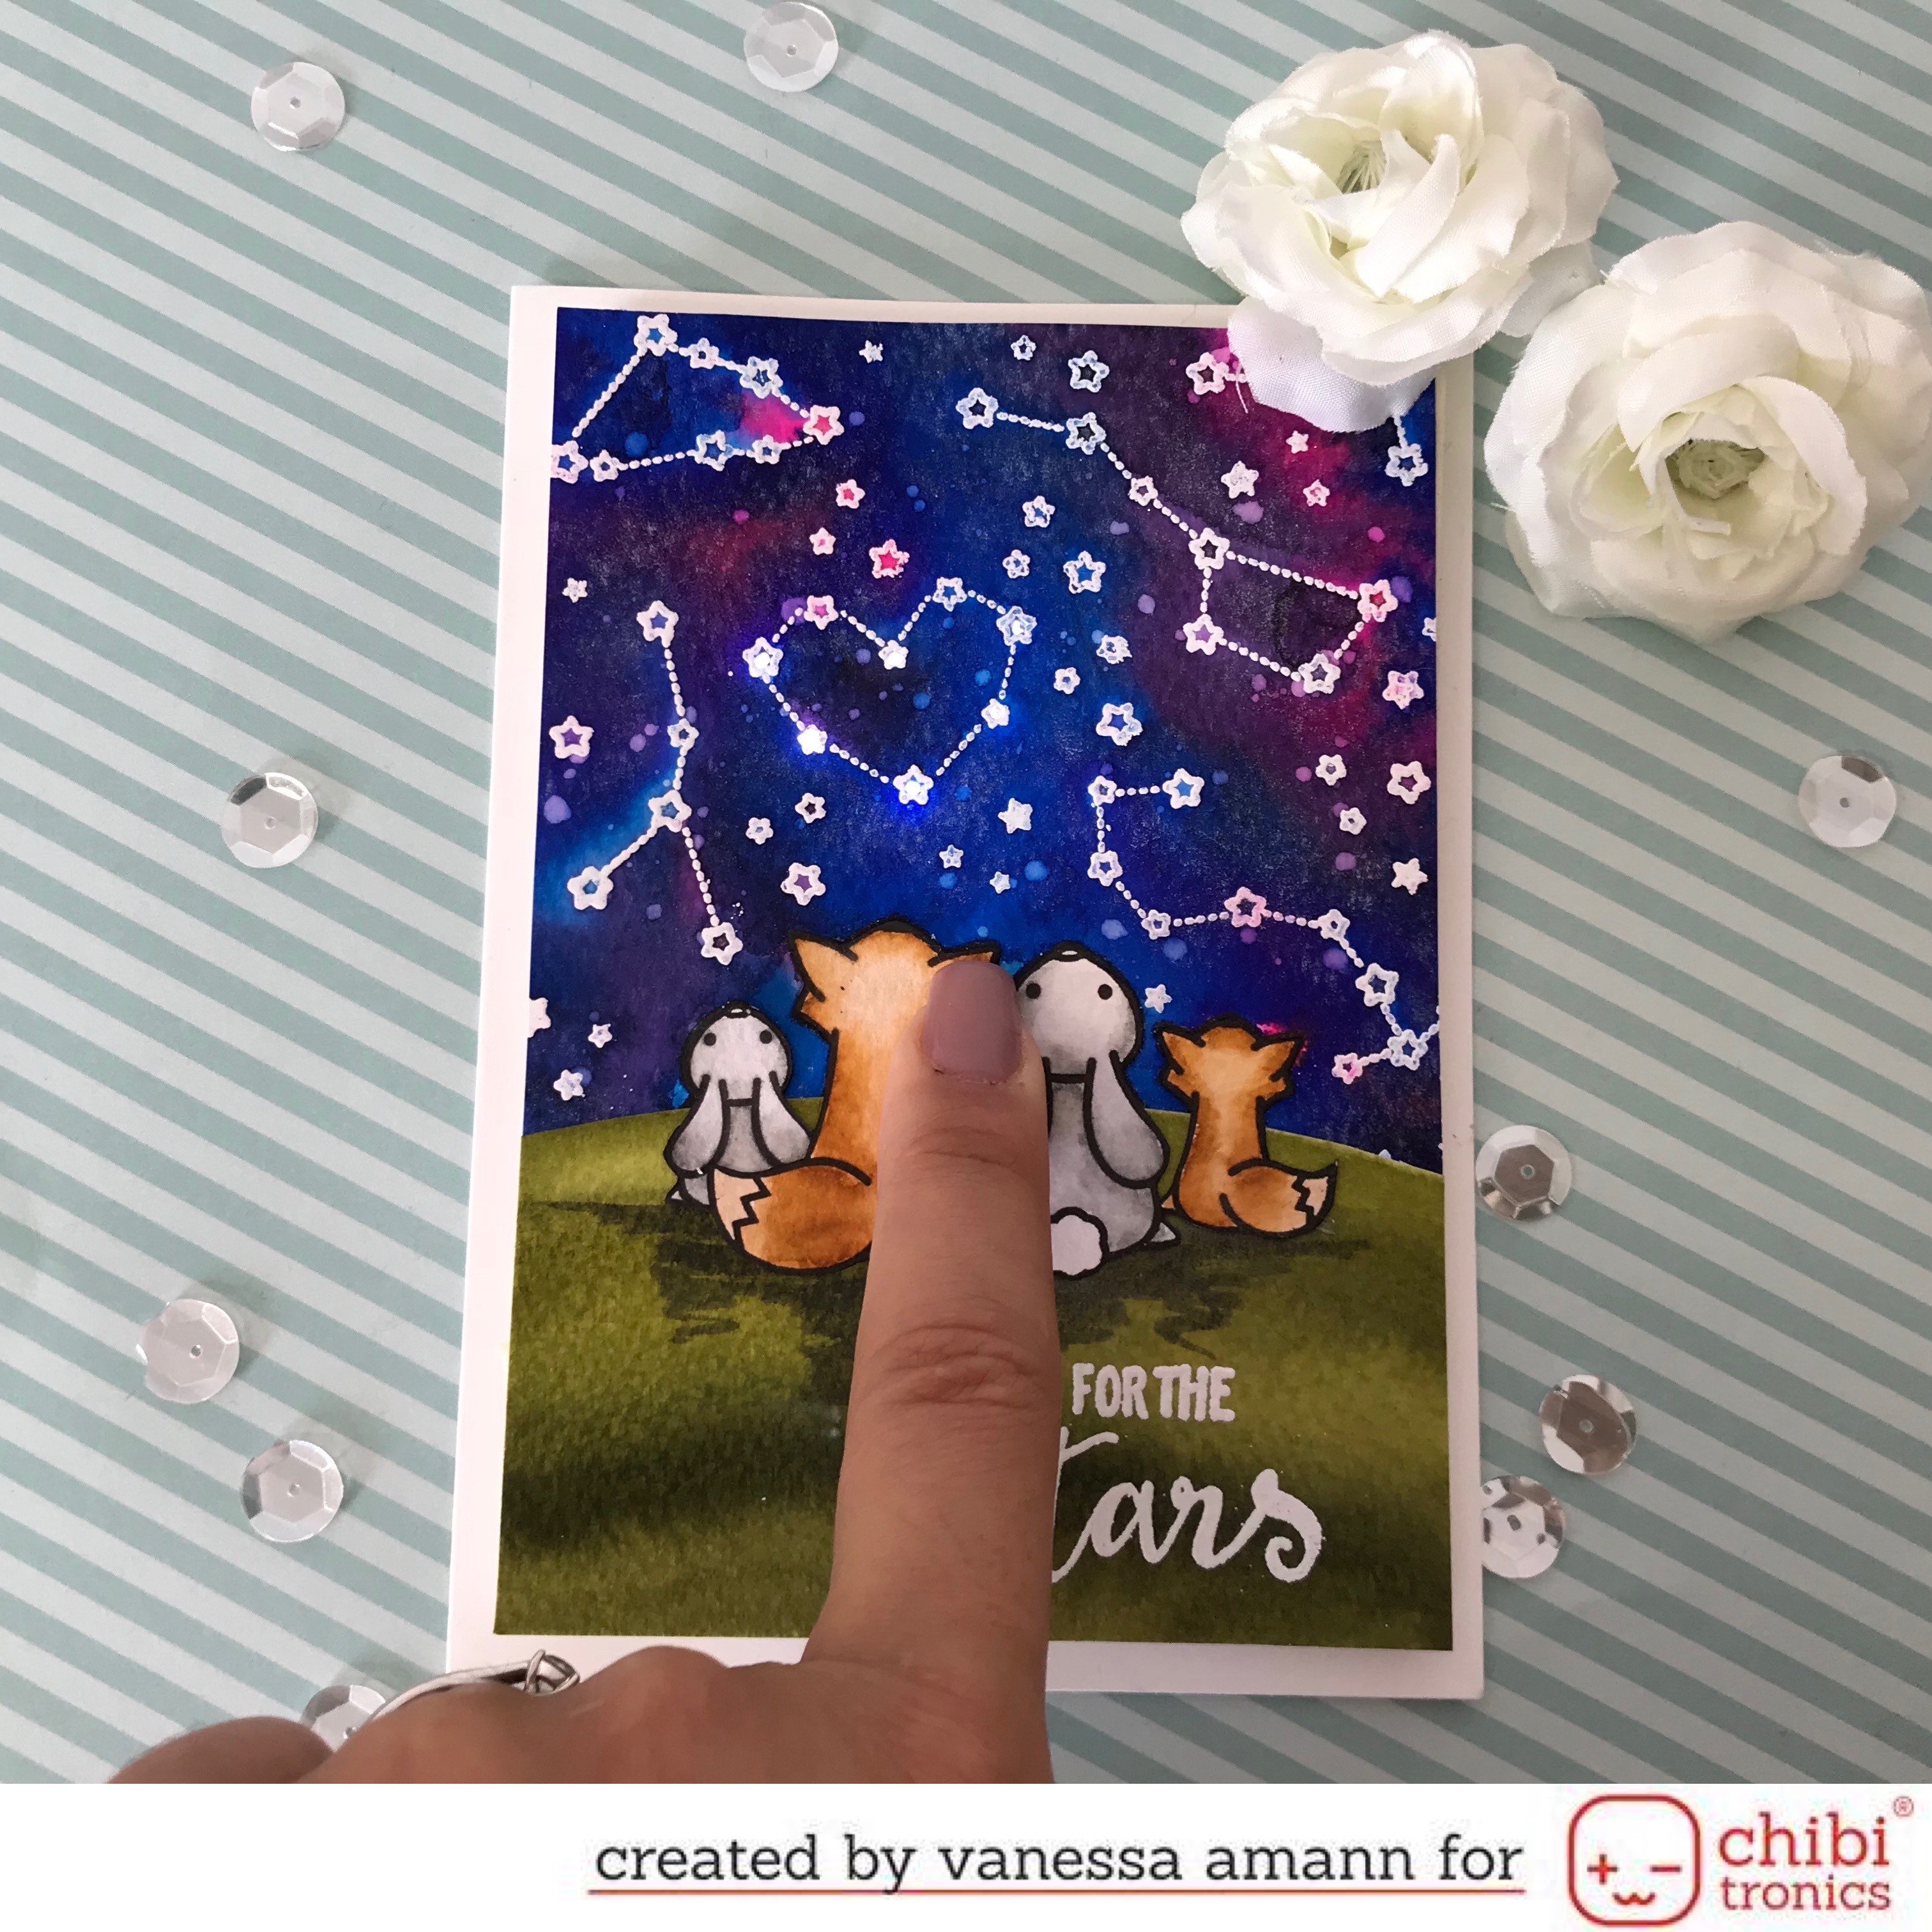
today I´m back with a new video tutorial using stamps from Lawn Fawn. For long time I wanted to use the upon a star set, but it never fit. But In case I would find an opportunity to use this set, I already knew what I wanted to create. I wanted to create a night sky background, with white heat embossed stars and star signs and the critters sitting on top of a hill looking for the amazing sky. And so it happens and I had the idea to create a shining star sign.


For creating this card I did the following steps and it one of the easiest shining cards I´ve ever made. Perhaps because I already knew about how to use this set. In case my written descriptions isn't enough, please watch the associated video:
  • I stamped the star and star sign images all over the card panel using a sticky ink pad, scatter white embossing powder over the images and heat set it. But don't forget to using something to take away the static, so the embossing powder only sticks to where you have stamped
  • To create my night sky I scribbled some Spectrum Noris Sparkles Pens and spray some water on top. I was surprised that the colors blended so well and created an amazing and so realistic looking look
  • I Stamped with a water proofed black ink pad on watercolor paper and colored my images using the Zig Real Color Brush Pens. I´m sorry, I totally forgot to write down the colors and now I can't remember. To blend the colors I used a dark shade, a middle one and used a watercolor brush to blend it out. After coloring I fuzzy cut all the images.
  • I scribbled a dark green and a middle green on watercolor paper and blended it out with my watercolor brush and created a hill shape. I fuzzy cut it also.
  • I glued my hill and my images on my card panel and gave the images some shadow underneath them. I wanted it to look more realistic.
  • Now to the technical part: the supplies you need for are white LED Stickers, Coppertape and a battery. You can find them on the Chibitronics Starter Kit, or buy everything individually. First I had to decide which stars should shine. The ones supposed to shine I pierced with a craft knife. I used a pen to draw in the LEDs and batteries places. Then I used my stencil to draw in the LED stickers. Now probably the most trickiest part, but just because the shining image is so tiny: connect the battery and the LEDs using copper tape. As the place where the stickers are is so tiny, I simply created two circuits, I wanted to avoid that accidentally plus and minus would cross and the card wouldn't shine. (I´m sorry, in case the explanation is bad, just look the video ;) )
  • At the end I covered everything with two layers of foam tape and taped it to a black card base. I didn´t add something more to the card because a) the card is shining and b) the Sparkle pens created so much glitter, I did´t want to overpower this card.

So this was my idea for today and I hope you enjoyed this card. In case you never tried making a LED card, I think this card would be perfect to start with. I just would reduce the amount of shining starts to perhaps three and creating the circuit would be much easier as it has been already. Try it ;) I wish you all a good weekend and until the next time,


Batterie Batterie
Chibitronics  Starter Kit
Chibitronics  LED white
Chibitronics  Cuppertape
Fiskars  Schneidebrett
Foam Tape 3M
Folia Bonefolder
Folia Watercolor paper
Folia Acrylblöcke
Folia Bastelskalpell
Kuretek Zig Real Color Brush Pens
Lawn Fawn Starry Skies
My Sweet Petunia MISTI Tool
Scotch 3M Tape Glider
Spectrum Noir Sparkles Vintage Hues
Spectrum Noir Sparkles Winter Warms
Tim Holtz Tonic Trimmer
Versafine Onyx Black
Versamark Watermark Ink
WOW Embossing Opaque White Embossing Powder


Lawn Fawn And Chibitronics Collaboration Blog Hop

Hello friends, 

today I´m back with a project for the Lawn Fawn and Chibitronics collaboration blog hop. here for I decided to use my out of this world stamp set from Lawn Fawn. I already found this set great to create a card in a box card, as I wanted to let the planets look like they are floating in the space. But I also had the idea of making a card in a box lightens up. This is how this card came together.  


First I stamped my images with my Memento Tuxedo black ink on whisper white paper from Stampin up as I was planning to use my Copic markers. In case you are interested in the color combination I´m using please watch my video ; ) After all the images have been colored I fuzzy cut them at trace the edges with my Memento marker, so there wouldn't be a white border in case I missed something to fuzzy cut.


Then  I created my pop-up box card. My box has german dimensions, so it would fit perfectly in a german C6 envelope. I created a separate video on this as I thought that the video would be to long. I wanted to focus on the stamps and the lightning system from Chibitronics. Lawn Fawn sells a great scallop box pop-up card die, so you don't even need to think about measurements. But here you can find the measurements, in case you missed in the video. All you need: 

1st piece: 10.5cm x 20cm

- long side score at 5cm, 15cm
- short side score at 5.5cm

2nd piece: 12cm x 10.5cm
- long side score at 1cm, 11cm

3rd piece: 12cm x 10.5cm
- long side score at 1cm, 11cm

- short side cut in three pieces


The next step is to create the galaxy background. I simply used my Wilted Violet, Peacock Feathers and Blueprint Sketch Distress Inks and applied them to the paper. I really blended them well, so it really would look like a galaxy. But without stars, a galaxy never would look like a galaxy. I used my white and silver colors from the Gansai Tambi watercolor palette and created some splatters all over the background. Now it really looks like a galaxy. 

After finishing the background I created my circuit to make the box light up. I want to make sure to create the circuit before I put the card together. It makes everything really easy and isn't a big difference compared to normal light up cards. In the video you can see how easy it is to create the box. I used copper tape, a 3V battery and white LEDs from Chibitronic. Only using this system makes it possible to bring interactive cards to another level. They always work and you don't need to worry about the LEDs lighten up. After finishing my lightning system and the box I can start to decorate the box panels. I used some acetate stripes to make the planets float. 


Lawn Fawn is giving away a $30 gift card and Chibitronics is giving away a starter kit to 2 lucky commenters randomly selected from the comments across all of the blogs over the next three days so make sure you leave a comments on all the blogs for the most chances to win!  Please leave your comments by 11:59PM ET on May 28th, 2017!  Head to the Chibitronics blog to see the rest of our projects today!


Thank you for stopping by today and until the next time I hope you have a wonderful day. 


Batterie Batterie Scotch 3M Tape Glider
Chibitronics  Starter Kit Sizzix BigShot
Chibitronics  LED white Stampin Up Schere
Chibitronics  Cuppertape Stampin Up Whisper Whiter
Create a Smile Acrylblöcke Tim Holtz Ink Blending Tool
Foam Tape 3M Tim Holtz Peacock Feathers
Folia Bonefolder Tim Holtz Blueprint Sketch
Incadincado Embossing Bag Tim Holtz Wilted Violet
Kuretek  Gansei Tambi Watercolor Tim Holtz Tonic Trimmer
Label Ocean Acetate Versamark Watermark Ink
Memento Tuxedo Black WOW Embossing Opaque White Embossing Powder
Ranger Multi Matte Medium Lawn Fawn Out of thid world


MerkenMerken

Waving happy birthday! - Video

Hallo ihr Lieben,

heute bin ich zurück mit einem Set Geburtstagskarten. Außerdem möchte ich an der zweiten Lawnfawnatics Challenge teilnehmen. Das Thema dieses Mal ist interaktive Karten. Deshalb habe ich mich dazu entschieden ein paar Schüttelkarten zu gestalten. Dieser Kartentyp ist fast mein Liebling, da die Beschenkten sich am meisten freuen, egal ob Groß, oder Klein!

Hello crafty friends, 

today I´m back with a set birthday cards. I also wanted to play along with the second Lawnfawnatics challenge, which is all about interactive cards. So I decided to create shaker cards, also because people who receive this card are always excited, equally whether big or small one. 


Da ich zu dieser Karte ein Video erstellt habe, werde ich hierzu nicht viel schreiben. Ich bin immer der Meinung, dass man es im Video besser sehen kann. Ich wünsche euch allen einen tollen Sonntag, frohe Ostern und wir sehen uns beim nächsten Mal wieder!

As I´ve created a video about this card I won't tell you much about it. I always think you see it better in the videos. I wish you all a great Sunday, happy easter and until the next time!


Copic Marker Copic Marker Pretty Pink posh Sparkling Clear 4mm
Folia Bonefolder Pretty Pink posh Sparkling Clear 6mm
Folia Acrylblöcke Pretty Pink posh Sparkling Clear Seed Beads
Folia Schere Ranger Multi Matte Medium
Folia Bistrolpapier Scotch 3M Tape Glider
Kuretek Wink of Stella Sizzix BigShot
Label Ocean Acetate Stampin Up Whisper Whiter
Lawn Fawn Mermaid for you Tim Holtz Mermaid Lagoon
Memento Tuxedo Black Tim Holtz Ink Blending Tool
My Favorite Things Inside & Outside Stitched Rectangles Tim Holtz Antique Linen
My Favorite Things  Blueprints 27 Tim Holtz Tonic Trimmer
WOW Embossing Opaque White Embossing Powder Versamark Watermark Ink