Happy Insta Grils Halloween Blog Hop


Hallo meine Lieben,

es ist wieder so weit- es ist Blog Hop- Zeit. Und wie könnte es auch anders sein, als unter dem Motto "Halloween". Vielleicht fragt ihr euch "Wer sind die Happy Insta Girls?" und "Was machen die"?! Eigentlich sind wir nur bastelwütige die sich dank unserer Insta (Instagram)-Mama Birka gefunden haben. Seit je her machen  wir zu gegebenen (und nicht gegebenen) Anlässen einen Blog hop. Ein wirkliches "warum" gibt es nicht :D Dieses mal wurde ich von der Lieben Birka  gezogen.. und schaut mal was sie mir geschickt hat. Ist das nicht süß (falls Halloween denn süß sein kann?).

Hello everybody,

we did it again- a blog hop. This time.. how could it be otherwise.. it is a halloween blog hop. May you ask yourself "who are they?!" and "why do they do this?!". I´ll answer: Birka, is our , I call her lovely Insta (=Instagram)- mother. She found us on Instagram and we build a group who decided to make these blog hops just for fun. Yes.. FUN! So, this time I got the card from the lovely Birka  :) Look how cute is that?


Wie bereits erwähnt ist dieses Mal das Thema Halloween dran. Ich muss sagen, dass ich mich mit den Zwischensaisons sehr schwer tue. Halloween/Herbst, ist nicht so mein Ding, genau so wie Ostern. 

As already told, this time the theme is halloween. I´m not that halloween card maker, nor do I fall or easter cards. I don't know why, but this is truly not my thing. 


Eigentlich gibt es nicht viel zu der Karte zu sagen. Von Außen betrachtet sieht die Karte sehr schlicht aus. Sogar zu Schlicht für meinen Geschmack. Aber ich wollte wirklich, dass das Innere der Karte etwas besonderes ist. Kerstin sollte sich ja schließlich freuen, wenn sie die Karte öffnet. Ich habe mir gedacht, ich bastel etwas wie eine Shadowbox in der Karte. Und zusätzlich noch ein Schüttelfenster. Es war wirklich so super schnell und einfach gebastelt, leider um so komplizierter das zu erklären. Dazu sollte ich besser ein Video machen, ich hoffe ich komme bald dazu.

There is not much to say about this card. I kept my front very clean and simple. To clean and simple for my taste. But I really wanted to focus on the inside of my card. I created something like a shadow bow inside the card, so when Kerstin would open it, it would pop up. And more, I wanted it to be a shaker window :) It was really easy to make, but to complicated to explain here. Sorry, I hope to create such a card for you as soon as possible. 

Das war´s jetzt auch zu meiner Karte, bitte Hoppe weiter zu nächsten Karte :)
So, you saw everything about my Card, please go to the next stop :) 


MerkenMerken

Happy Halloween

Hallo ihr Lieben,

heute habe ich mal eine so ganz andere Karte für euch. Ich habe nämlich mal nichts gestanzt oder gestempelt. Die Karte ist rein gemalt. Eigentlich gibt es auch wirklich nicht viel zu sagen, da ich ein Mini Video für euch erstellt habe. Die Karte ist wirklich super einfach. 


Zuerst habe ich eingezeichnet wie ich was haben will. Nachdem alles eingezeichnet wurde, habe ich es direkt wieder abradiert. Der Grund dafür? Ich will ja nicht, dass man die Bleistiftstreifen überall sieht. Und dann habe ich nur mit dem Liquid Masking das Happy Halloween geschrieben und den Friedhof zu malen. Nachdem es getrocknet ist, habe ich mit dem schwarzen Aqua Pen und den Sparkle Pens den Hintergrund erstellt. Mit einem Radierer habe ich das Liquid Masking abgemacht und den Rest der Karte gemalt. Also alles wirklich super einfach.


Ich muss ja ehrlich gestehen, dass Halloween wirklich nicht mein Ding ist, und ich auch nicht viele Halloween-Sachen habe, aber diese Karte hat so super viel Spaß gemacht. Ich konnte im Prinzip aus dem nichts, eine super tolle Karte kreieren. Ich hoffe ihr konntet euch auch inspirieren und meine Karte gefällt euch. 


Crafters Companion Watercolour Paper
Crafters Companion Rock a Block
Crafters Companion Macaroons
Spectrum Noir Aqua Marker
Spectrum Noir Sparkles Vintage Hues
Spectrum Noir Sparkles Winter Warms
Tim Holtz Tonic Trimmer
Versamark Watermark Ink
WOW Embossing Opaque White Embossing Powder
WOW Embossing Gold Rich super fine
Wassertankpinsel
EK Success Powder Tool
Fiskars  Schneidebrett
Foam Tape 3M


Merry Christmas

Hallo ihr Lieben,

heute bin ich wieder für Crafters Companions unterwegs. Ich habe eine geniale, aber doch einfache Technik für euch. Und zwar kann man sich aus den Stanzen auch eigene Stencil machen. 


Nachdem ich meine Stanzen gewählt und auch auf einem Papier ausgestanzt habe, habe ich das Papier nun als Schablone verwendet. Ich habe dazu Embossingpaste genommen und einfach über Kraftpapier gestrichen. Das ging wirklich super einfach.
Nachdem alles getrocknet war habe ich mit einer Kreisstanze ein Fenster aus der Karte geschnitten. Dieses Fenster wollte ich jedoch nicht wegwerfen, da ich es so toll fand. Weshalb ihr heute auch zwei Karten von mir zu sehen bekommt ;) Den Spruch habe ich jeweils auf beiden Karten gestempelt und mit gold embossed. Ein kleines Schleifchen rundet die Karte noch ab und schon ist sie fertig. Die Karte, oder die beiden Karten eignen sich super auch in Massen angefertigt zu werden. Es war wirklich Kinderleicht.


Ich hoffe sehr, dass euch mein technikreicher Beitrag gefallen hat und wir sehen uns bald wieder. Ich wünsche euch allen noch einen tollen Sonntag und frohes nachbasteln ;)


Crafters Companion Dashig Deer
Crafters Companion Kraft Cardstock
Crafters Companion Neenah Solar White
Crafters Companion Nordic Cross
Crafters Companion Rock a Block
Crafters Companion Sentimental Christmas
Crafters Companion Swedish snowflake
EK Success Powder Tool
Scotch 3M Tape Glider
Sizzix BigShot
Versamark Watermark Ink
WOW Embossing Gold Rich super fine
Stempendous Embossing Paste


Crafters Companions Birthday Week Blog Hop


Hallo ihr Lieben, 

heute bin ich zurück mit einem Projekt zu dem Geburtstags-Blog-Hop von Crafters Companion. Diese Woche hat Crafters Companion Geburtstag und das muss natürlich gefeiert werden. Das Wort welches ihr für das Gewinnspiel benötigt ist „UND“.

Hello friends,

today I have a project to share with you which is part of the Crafters Companion Blog Hop. This week Crafters Companion has birthday and we want to celebrate it with you. The word you will need for the give away is „UND“.


Um die Karte zu erstellen habe ich die Macaroons mit Versamark Stempelkissen gestempelt, und dann goldenes Embossing Pulver erhitzt. Ich habe meine Sparkle Pens und einen Aquarellpinsel verwendet um diesen soften und pastelligen look zu kreieren. Denn auf diesen war ich aus. 

To create this look I stamped the macaroons with Vermark ink and used gold embossing powder and heat set it. I used my Sparkle pens and a watercolor brush to create this look. I was looking for a truely pastelly and soft look. 


Da das Motiv der Karte eine gute Größe hat, habe ich also den Kartenaufleger 1cm kleiner geschnitten als die Kartenbasis. Ich habe den Aufleger mit Abstandsklebeband aufgeklebt, damit die Karte ein bisschen interessanter wirkt. Das gleiche habe ich auch mit dem Spruch gemacht. Zuerst habe ich noch überlegt durchsichtige Pailletten aufzukleben, habe es aber gelassen, da die Karte so schon genug glitzert.


As the image has a good size for a card, I decided to trimm the card panel 1cm shorter that the actual card size, I used foam tape the create some dimension and heat set a sentiment with white powder on a black cardstock stripe. I also used foam tape to tape the sentiment down. First I thought I would use some clear sequins, but as the card is full of glitter I decided to keep them away. 


Wir feiern hier mit euch den Geburtstag von Crafters Companion. Und beschenkt werdet ihr! Da aber nicht alles im Leben umsonst ist, müsst ihr eine Kleinigkeit tun. Es ist eine Art Schnitzeljagd. Auf jedem Blog bekommt ihr ein Wort mitgeteilt und der Satz ist der Schlüssel zur Lösung. Hier einmal die Regeln und Fakten:


You have to check out all of the DT projects, because we have all hidden something in our blog posts - a word! Collect all of the words together, in the right order and you will have a sentence that you need to claim the prize. 

  • Teilnahmeschluss/ Closing Date: 28 Oktober
  • Bekanntgabe des Gewinners/ Winner Announcement: 30. Oktober
  • Preis/ Price: Aqua Marker

Teilnahmebedingungen/ Entry Requirements:


Hop-Reihenfolge/ Hop order


you are here ->Vanessa<- du bist hier
next stop ->Sandy<- nächster Stopp


Ich hoffe, dass auch heute meine Karte gefallen hat, ich drücke allen Teilnehmern die Daumen und wünsche euch noch ein schönes Wochenende. 


I wish each participant good look, a very nice weekend and I hope you liked my card for today. 


Crafters Companion Watercolour Paper
Crafters Companion Rock a Block
Crafters Companion Macaroons
Spectrum Noir Aqua Marker
Spectrum Noir Sparkles Vintage Hues
Spectrum Noir Sparkles Winter Warms
Tim Holtz Tonic Trimmer
Versamark Watermark Ink
WOW Embossing Opaque White Embossing Powder
WOW Embossing Gold Rich super fine
Wassertankpinsel
EK Success Powder Tool
Fiskars  Schneidebrett
Foam Tape 3M

MerkenMerken

Heffy Doodle Guest Designer

Hello friends,

today I have a special card to share with you. I don't even know how this are called, but as I saw this cute little bear I knew I wanted the card to look like this. And I´m so super excited to be guest designing for Heffy Doodle. This stamp company is pretty new (since summer 2017) and came up with five stamp sets (and matching dies) and each one is better than the other. For my card today I´ve used the unbearable without you stamp set.


In case you think this card looks amazing but complicated to make, I can show you, that it isn't. The duration of this card making video shows, that it is super fast to make, as I could shorten the video to five minutes and a bit. The trickiest part was figuring out the measurements, but I already did the work for you, so you could save some time and start crafting.


I stamped my bear image seven (!!!) times using Memento tuxedo black ink and stamped on Neenah white paper. The images are colored with my Copic markers (E44, E43, E42, RV00) and fuzzy cut.

The card base is 7,5cm x 22cm and has to be scored at 3,5cm, 6,5cm, 15,5cm, 18,5cm. I didn´t fold the card until I created my background. To create the background I used post it tape and created my own snow drifts and colored the background with Faded Jeans and Broken China Distress Oxide Inks. I used the negative pieces from the snow drifts to create snow hills using Tumbled Glass Distress Ink. To create snow, I used a Shimmer Spitz and scattered it over my card base. I used a star image and stamped it with the shimmer spritz also.

I hope that you liked my project for today and we will see us soon. Thank you to Lesley for letting me show my card on Heffy Doodles Blog today. 


Big Hugs,

Heffy Doodle Interactively yours
Heffy Doodle Unbearable without you
Copic Marker Copic Marker
Fiskars  Schneidebrett
Folia Bonefolder
Folia Schere
Herma Removable Label Herma Removable Label
Incadincado Embossing Bag
Memento Tuxedo Black
My Sweet Petunia MISTI Tool
Neenah Solar White Paper Ultra Heavy
Ranger Glossy Accents
Scotch 3M Tape Glider
Tim Holtz Tumbled Glass Ink
Tim Holtz Ink Blending Tool
Tim Holtz Distress Oxide Broken China
Tim Holtz Distress Oxide Faded Jeans
Tombow Mono Multi 
Versafine Onyx Black
Versamark Watermark Ink
WOW Embossing Opaque White Embossing Powder


Reach For The Stars- LED CARD

Hello crafty people,

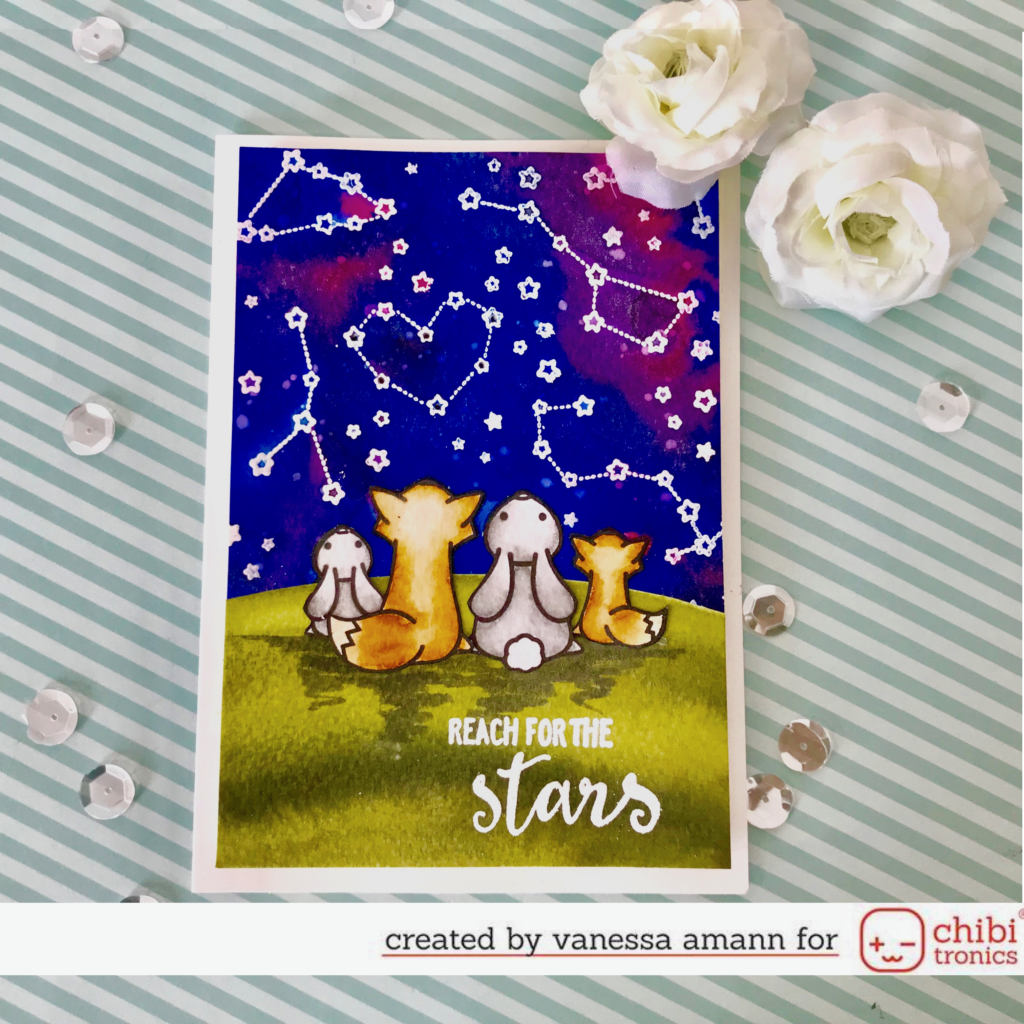
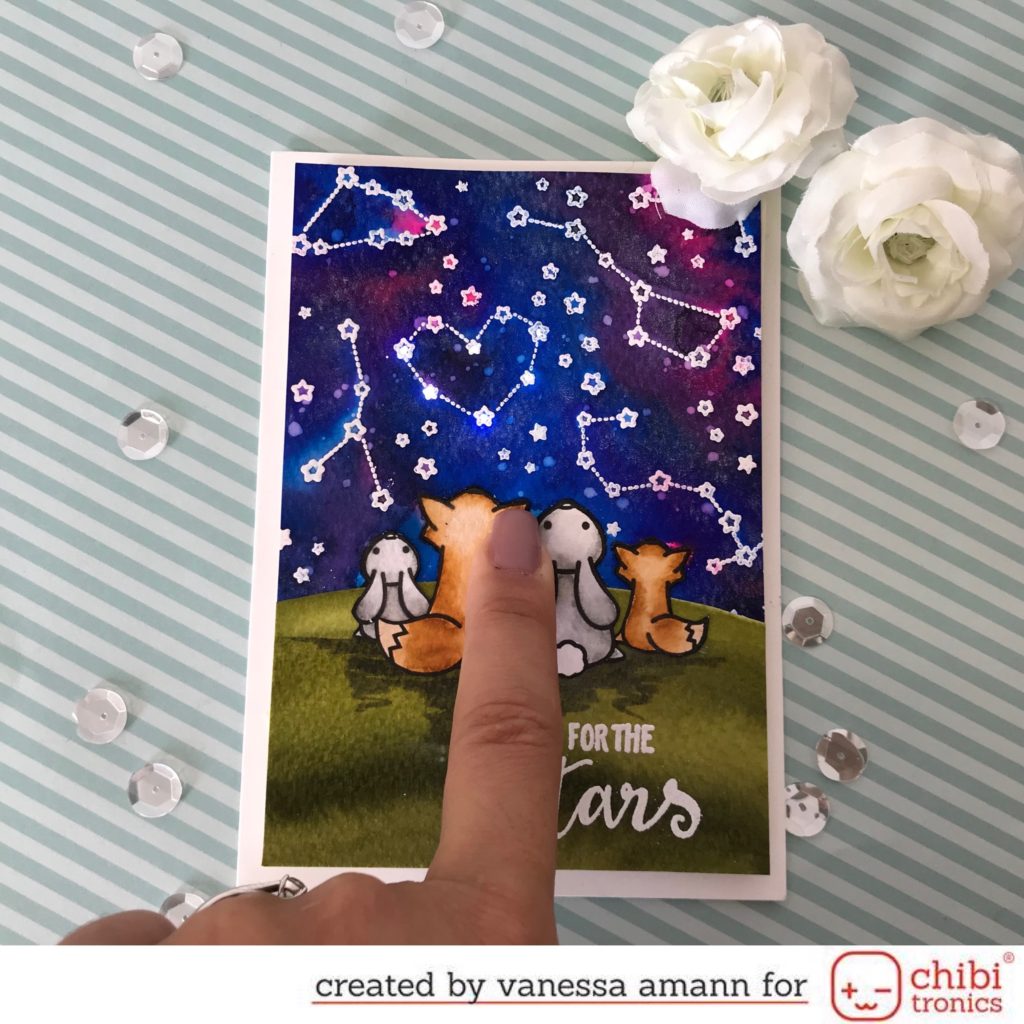
today I´m back with a new video tutorial using stamps from Lawn Fawn. For long time I wanted to use the upon a star set, but it never fit. But In case I would find an opportunity to use this set, I already knew what I wanted to create. I wanted to create a night sky background, with white heat embossed stars and star signs and the critters sitting on top of a hill looking for the amazing sky. And so it happens and I had the idea to create a shining star sign.


For creating this card I did the following steps and it one of the easiest shining cards I´ve ever made. Perhaps because I already knew about how to use this set. In case my written descriptions isn't enough, please watch the associated video:
  • I stamped the star and star sign images all over the card panel using a sticky ink pad, scatter white embossing powder over the images and heat set it. But don't forget to using something to take away the static, so the embossing powder only sticks to where you have stamped
  • To create my night sky I scribbled some Spectrum Noris Sparkles Pens and spray some water on top. I was surprised that the colors blended so well and created an amazing and so realistic looking look
  • I Stamped with a water proofed black ink pad on watercolor paper and colored my images using the Zig Real Color Brush Pens. I´m sorry, I totally forgot to write down the colors and now I can't remember. To blend the colors I used a dark shade, a middle one and used a watercolor brush to blend it out. After coloring I fuzzy cut all the images.
  • I scribbled a dark green and a middle green on watercolor paper and blended it out with my watercolor brush and created a hill shape. I fuzzy cut it also.
  • I glued my hill and my images on my card panel and gave the images some shadow underneath them. I wanted it to look more realistic.
  • Now to the technical part: the supplies you need for are white LED Stickers, Coppertape and a battery. You can find them on the Chibitronics Starter Kit, or buy everything individually. First I had to decide which stars should shine. The ones supposed to shine I pierced with a craft knife. I used a pen to draw in the LEDs and batteries places. Then I used my stencil to draw in the LED stickers. Now probably the most trickiest part, but just because the shining image is so tiny: connect the battery and the LEDs using copper tape. As the place where the stickers are is so tiny, I simply created two circuits, I wanted to avoid that accidentally plus and minus would cross and the card wouldn't shine. (I´m sorry, in case the explanation is bad, just look the video ;) )
  • At the end I covered everything with two layers of foam tape and taped it to a black card base. I didn´t add something more to the card because a) the card is shining and b) the Sparkle pens created so much glitter, I did´t want to overpower this card.

So this was my idea for today and I hope you enjoyed this card. In case you never tried making a LED card, I think this card would be perfect to start with. I just would reduce the amount of shining starts to perhaps three and creating the circuit would be much easier as it has been already. Try it ;) I wish you all a good weekend and until the next time,


Batterie Batterie
Chibitronics  Starter Kit
Chibitronics  LED white
Chibitronics  Cuppertape
Fiskars  Schneidebrett
Foam Tape 3M
Folia Bonefolder
Folia Watercolor paper
Folia Acrylblöcke
Folia Bastelskalpell
Kuretek Zig Real Color Brush Pens
Lawn Fawn Starry Skies
My Sweet Petunia MISTI Tool
Scotch 3M Tape Glider
Spectrum Noir Sparkles Vintage Hues
Spectrum Noir Sparkles Winter Warms
Tim Holtz Tonic Trimmer
Versafine Onyx Black
Versamark Watermark Ink
WOW Embossing Opaque White Embossing Powder


Blue Poinsettia

Hallo ihr Lieben,

heute bin ich wieder zurück mit einer Weihnachtskarte. Dieses Mal ist es total ausgeartet. Ausgeartet im Glitzerrausch. Aber ich persönlich finde ja, dass Weihnachtskarten auch glitzern dürfen.


Angefangen habe ich, in dem ich den Kranz mit Memento Tuxedo Black Ink auf Neenah Papier gestempelt habe. Dieses Papier und das Stempelkissen brauchst man, wenn man nämlich mit den Spectrum Noir Markern malen möchte. Ich liebe Weihnachtssterne, allerdings wollte ich mal eine andere Farbe als rot. Nach kurzer Google-Recherche fand ich auch blaue Weihnachtssterne. Also habe ich meine in blau gemalt. Ich habe verschiedene blau-Kombinationen verwendet, damit nicht alles gleich aussieht. Genau so bin ich auch bei den Blättern vorgegangen. Ich habe ebenfalls die Zwischenräume, die eigentlich (glaube ich?) nichts sind in grün angemalt. Ich wollte das der Kranz voller wirkt. Den Kranz habe ich anschließend ausgeschnitten und für die Innenseite ein Bastelskalpell verwendet. Die Blumen habe ich anschließend vorsichtig mit einem blauen Sparkles Stift angemalt und die Mitte mit Perlen versehen. Außerdem haben die Beeren eine Schicht Glossy Accents erhalten. Eine blaue Schleife mit Glöckchen sollten dem Kranz noch den letzten Schliff verpassen. Der Hintergrund wurde mit einem hellblauen Sparkle Stift und ganz viel Wasser hergestellt. Dazu habe ich aber das Aquarellpapier verwendet, sonst wäre das nichts geworden. Für die glitzernden Seitenstreifen habe ich das silber Glitzerpapier verwendet. Ganz zum Schluss gab es noch einen Spruch und die Karte ist auch schon fertig.


Ich hoffe, dass euch diese doch recht einfache Karte gefallen hat, und das ich auch euch dazu inspirieren konnte mal gewohntes in anderen Farben herzustellen. Ich wünsche euch noch eine schöne Woche und bis zum nächsten Mal wieder. 


Crafters Companion Neenah Solar White
Crafters Companion Rock a Block
Crafters Companion Poinsettia Wreath
Folia Bastelskalpell
Folia Schere
Folia Glöckchen
Folia Dekoperlenset
Ranger Multi Matte Medium
Scotch 3M Tape Glider
Spectrum Noir Set of 6
Spectrum Noir Sparkles Vintage Hues
Spectrum Noir Sparkles Winter Warms
Tim Holtz Tonic Trimmer
Tombow Mono Multi 
Versafine Onyx Black


Bee Sweet - Honey Bee and Chibitronics Collaboration Blog Hop


Hello friends, 

today is world card making day and for this Chibitronics and Honey Bee Stamps are making a collaboration blog hop. Along with this blog hop there will be amazing designers showing there creations and for sure a give away. 


First of all I have to admit, that I wanted to create a video for you. But it shouldn't be so. The first time there was something in front of my camera and you would have missed the half video if I had cut it down. So I tried another card and I filmed everything in one pass. But the file was to big and I wasn't able to get it on my mac. I´m really sorry, but I will try to explain. 
  • I always like to start coloring all the images I need: I stamped with Memento Tuxedo black ink on Neenah Solar white 80lbs and colored all the images using my Copic Markers.
  • After coloring I fuzzy cut the images and traced around the edges with a black pen to have a nice finish.
  • I layer everything on my card panel so I new where to stamp the bee images (I wanted to have the little bee sensors) and where my switch for the circuit would be. I die cut a circle where I wanted the battery, like always I like to hide the thickness of these cards. 
  • Below you can find how I created this circuit. It is a simples parallel circuit with a switch. the most difficult part is designing and assembling the card. But this time it was pretty easy. In each place where is a LED there is a bee on top.
  • Mask of the half card panel and ink blend it using distress inks (antique linen for the wooden part; tumbled glass for the sky part).
  • Die cut the card panel. I used a My Favorite Things background die.
  • Stamp the sentiment using Versafine onyx black and my Misti tool. I didn´t want to mess it up.
  • I used two layers of foamtape. But not behind the whole card. One layer behind the card panel. And one layer behind the honey pot. This is how I normally hide the thickness of the battery.
  • Assemble the card and scatter some sequins on the whole card panel. Now the card is done :) 
  • A little TIPP: I used the little "press here" from Heffy Doodle so the recipient knows where to press and can see that it lightens up. 


A video on how this card lights uo will be posted on my Instagram account. 


This is all for today and I´m really sorry that it appears like I wasn't prepared =/ I was really frustrated when I saw that I wasn't able to make the video for you. I liked this card so much and it was easy to create, so it would have been easy for you to recreate. But I hope my instructions could help you. I wish you all a happy World Cardmaking Day and a happy weekend. Please don't forget to go to the next stops. Honeybee is giving a $25 gift certificate drawn randomly from comments left across all blogs and Chibitronics is giving away a starter kit. Comments will close at 11:59 ET on Sunday, October 8th and the winners will be announced next week. 


Chibitronics  Starter Kit My Favorite Things  Blueprints 25
Chibitronics  LED white My Sweet Petunia MISTI Tool
Chibitronics  Cuppertape Neenah Solar White Paper Ultra Heavy
Copic Marker Copic Marker Ranger Multi Matte Medium
Create a Smile Acrylblöcke Scotch 3M Tape Glider
Fiskars  Schneidebrett Sizzix BigShot
Foam Tape 3M Stampin Up Schere
Folia Bonefolder Tim Holtz Tumbled Glass Ink
Folia Acrylblöcke Tim Holtz Ink Blending Tool
Folia Bastelskalpell Tim Holtz Antique Linen
Lifestyle Crafters Quick Stick Tool Tombow Mono Multi 
Memento Tuxedo Black Versafine Onyx Black
Honey Bee Stamps Sweet as Honey