Posts mit dem Label Video werden angezeigt. Alle Posts anzeigen

Heffy Doodle Guest Designer

Hello friends,

today I have a special card to share with you. I don't even know how this are called, but as I saw this cute little bear I knew I wanted the card to look like this. And I´m so super excited to be guest designing for Heffy Doodle. This stamp company is pretty new (since summer 2017) and came up with five stamp sets (and matching dies) and each one is better than the other. For my card today I´ve used the unbearable without you stamp set.


In case you think this card looks amazing but complicated to make, I can show you, that it isn't. The duration of this card making video shows, that it is super fast to make, as I could shorten the video to five minutes and a bit. The trickiest part was figuring out the measurements, but I already did the work for you, so you could save some time and start crafting.


I stamped my bear image seven (!!!) times using Memento tuxedo black ink and stamped on Neenah white paper. The images are colored with my Copic markers (E44, E43, E42, RV00) and fuzzy cut.

The card base is 7,5cm x 22cm and has to be scored at 3,5cm, 6,5cm, 15,5cm, 18,5cm. I didn´t fold the card until I created my background. To create the background I used post it tape and created my own snow drifts and colored the background with Faded Jeans and Broken China Distress Oxide Inks. I used the negative pieces from the snow drifts to create snow hills using Tumbled Glass Distress Ink. To create snow, I used a Shimmer Spitz and scattered it over my card base. I used a star image and stamped it with the shimmer spritz also.

I hope that you liked my project for today and we will see us soon. Thank you to Lesley for letting me show my card on Heffy Doodles Blog today. 


Big Hugs,

Heffy Doodle Interactively yours
Heffy Doodle Unbearable without you
Copic Marker Copic Marker
Fiskars  Schneidebrett
Folia Bonefolder
Folia Schere
Herma Removable Label Herma Removable Label
Incadincado Embossing Bag
Memento Tuxedo Black
My Sweet Petunia MISTI Tool
Neenah Solar White Paper Ultra Heavy
Ranger Glossy Accents
Scotch 3M Tape Glider
Tim Holtz Tumbled Glass Ink
Tim Holtz Ink Blending Tool
Tim Holtz Distress Oxide Broken China
Tim Holtz Distress Oxide Faded Jeans
Tombow Mono Multi 
Versafine Onyx Black
Versamark Watermark Ink
WOW Embossing Opaque White Embossing Powder


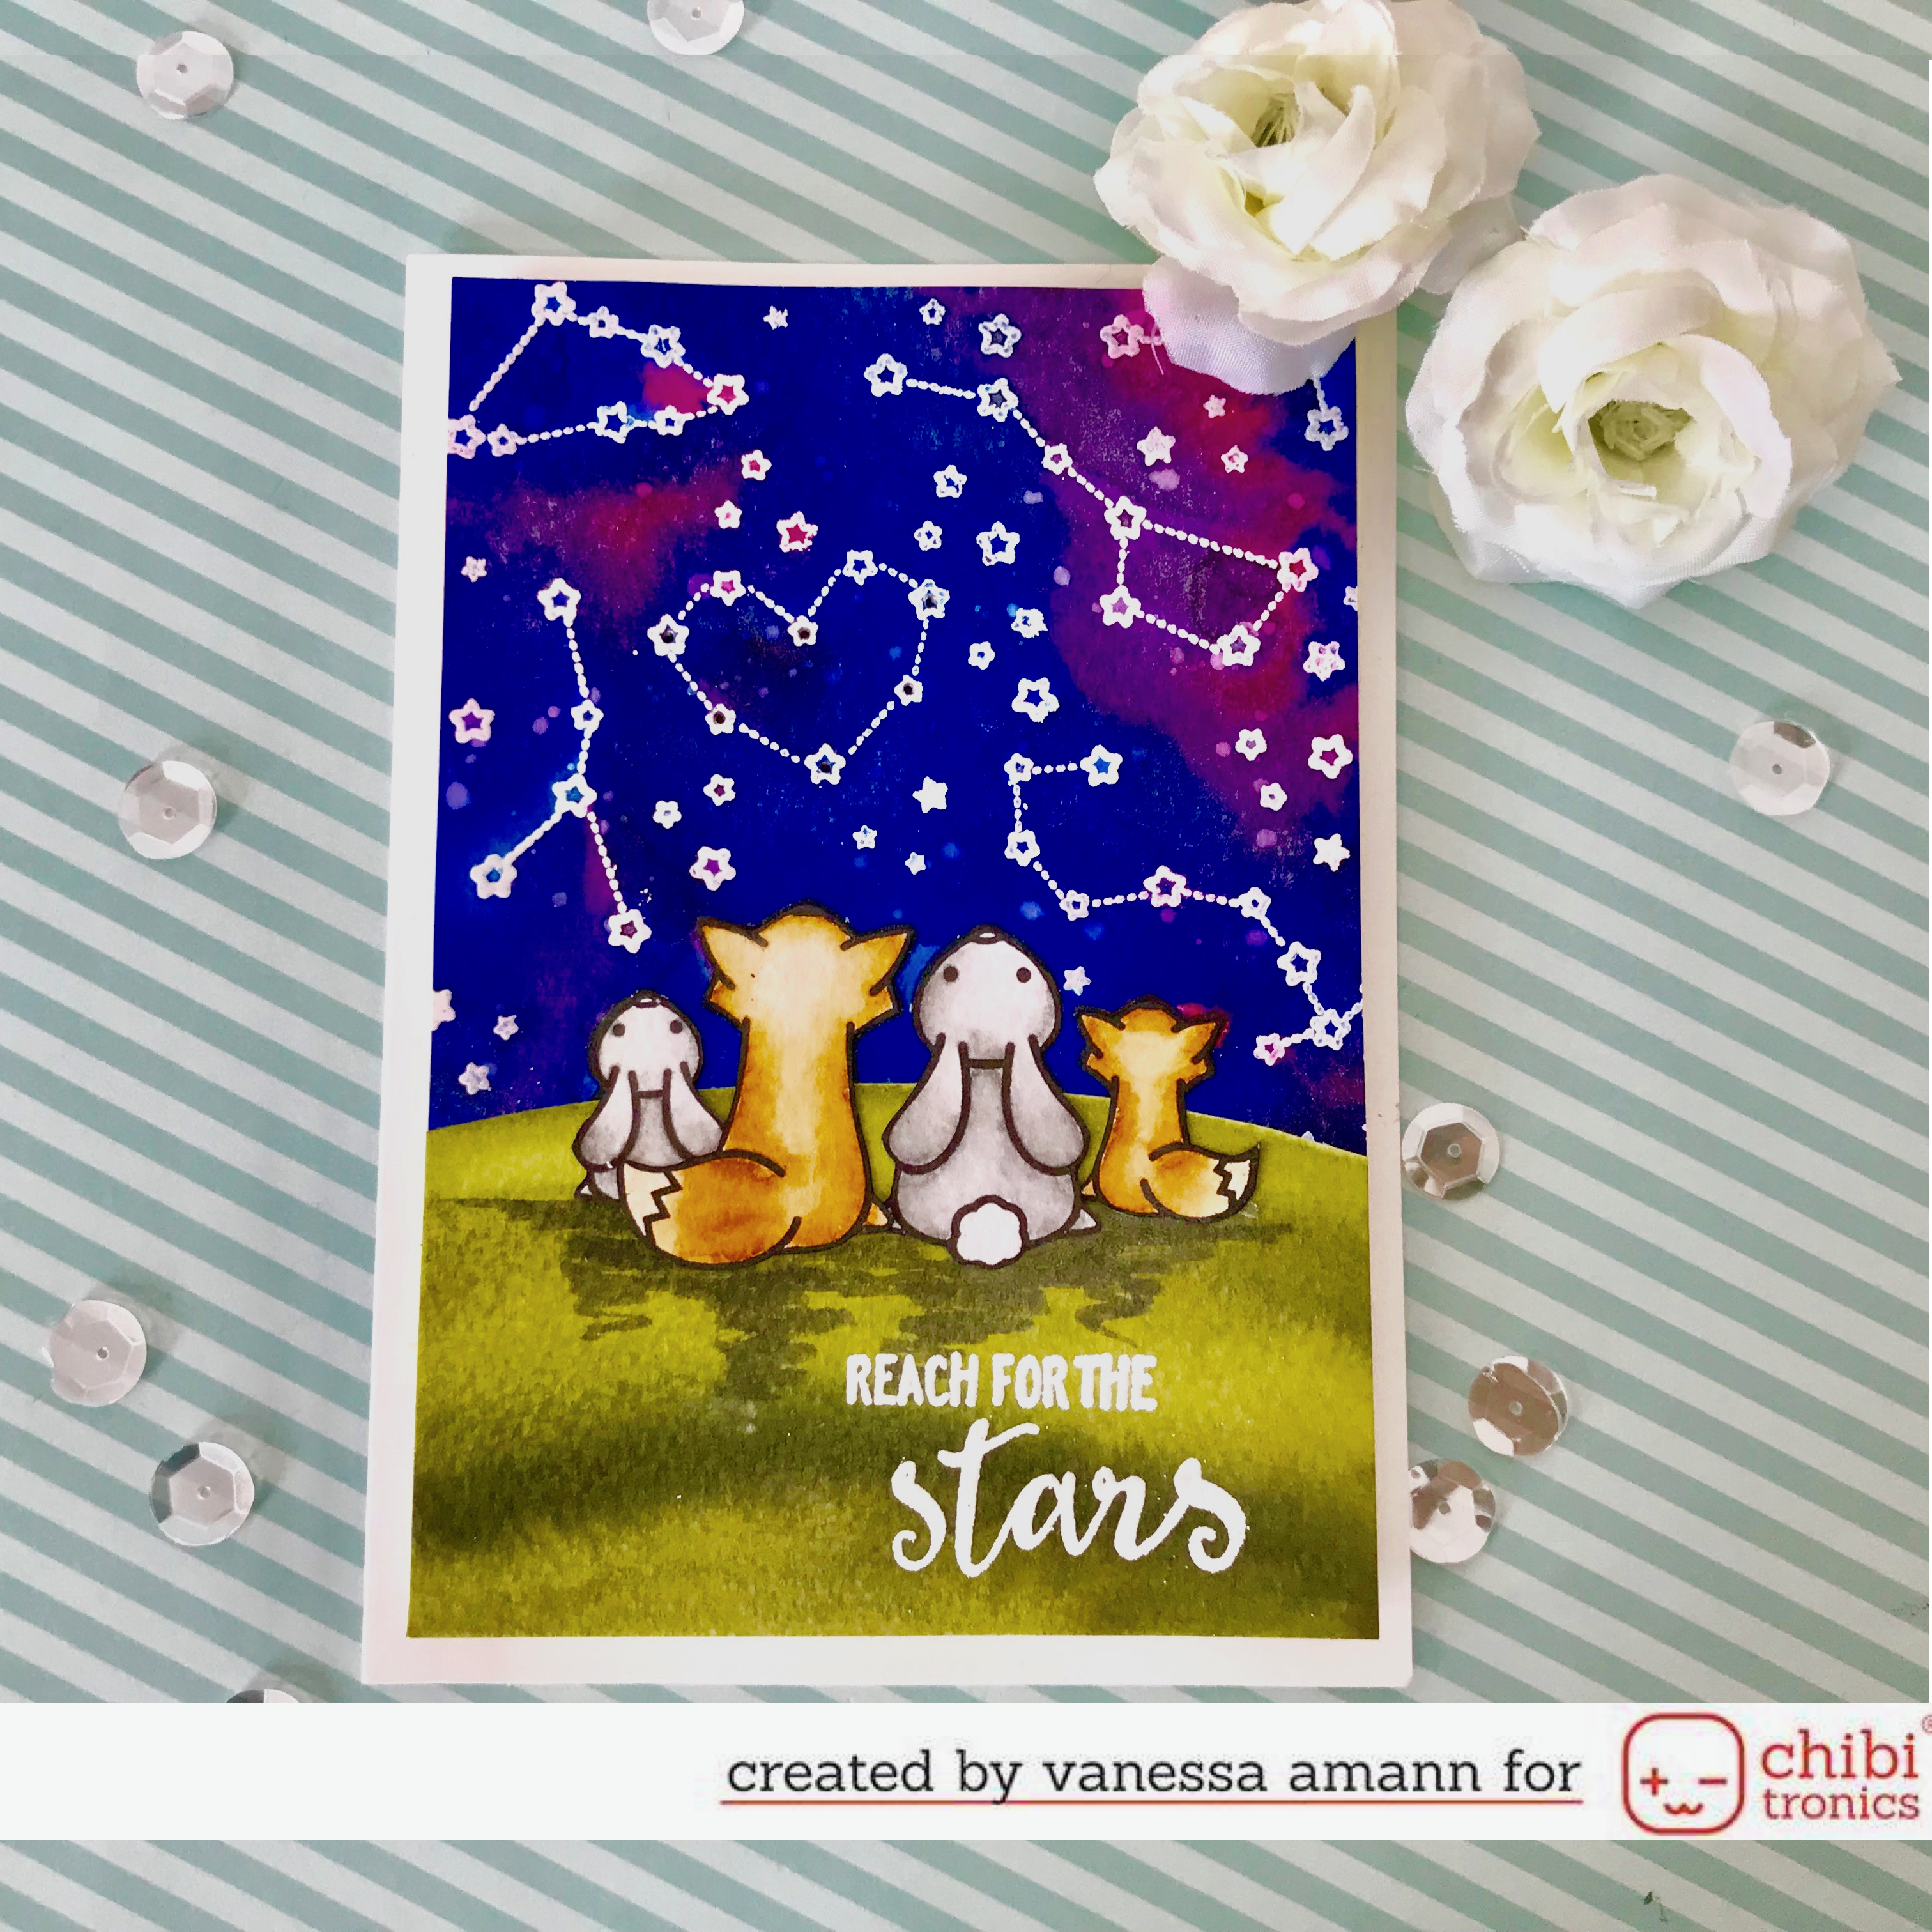
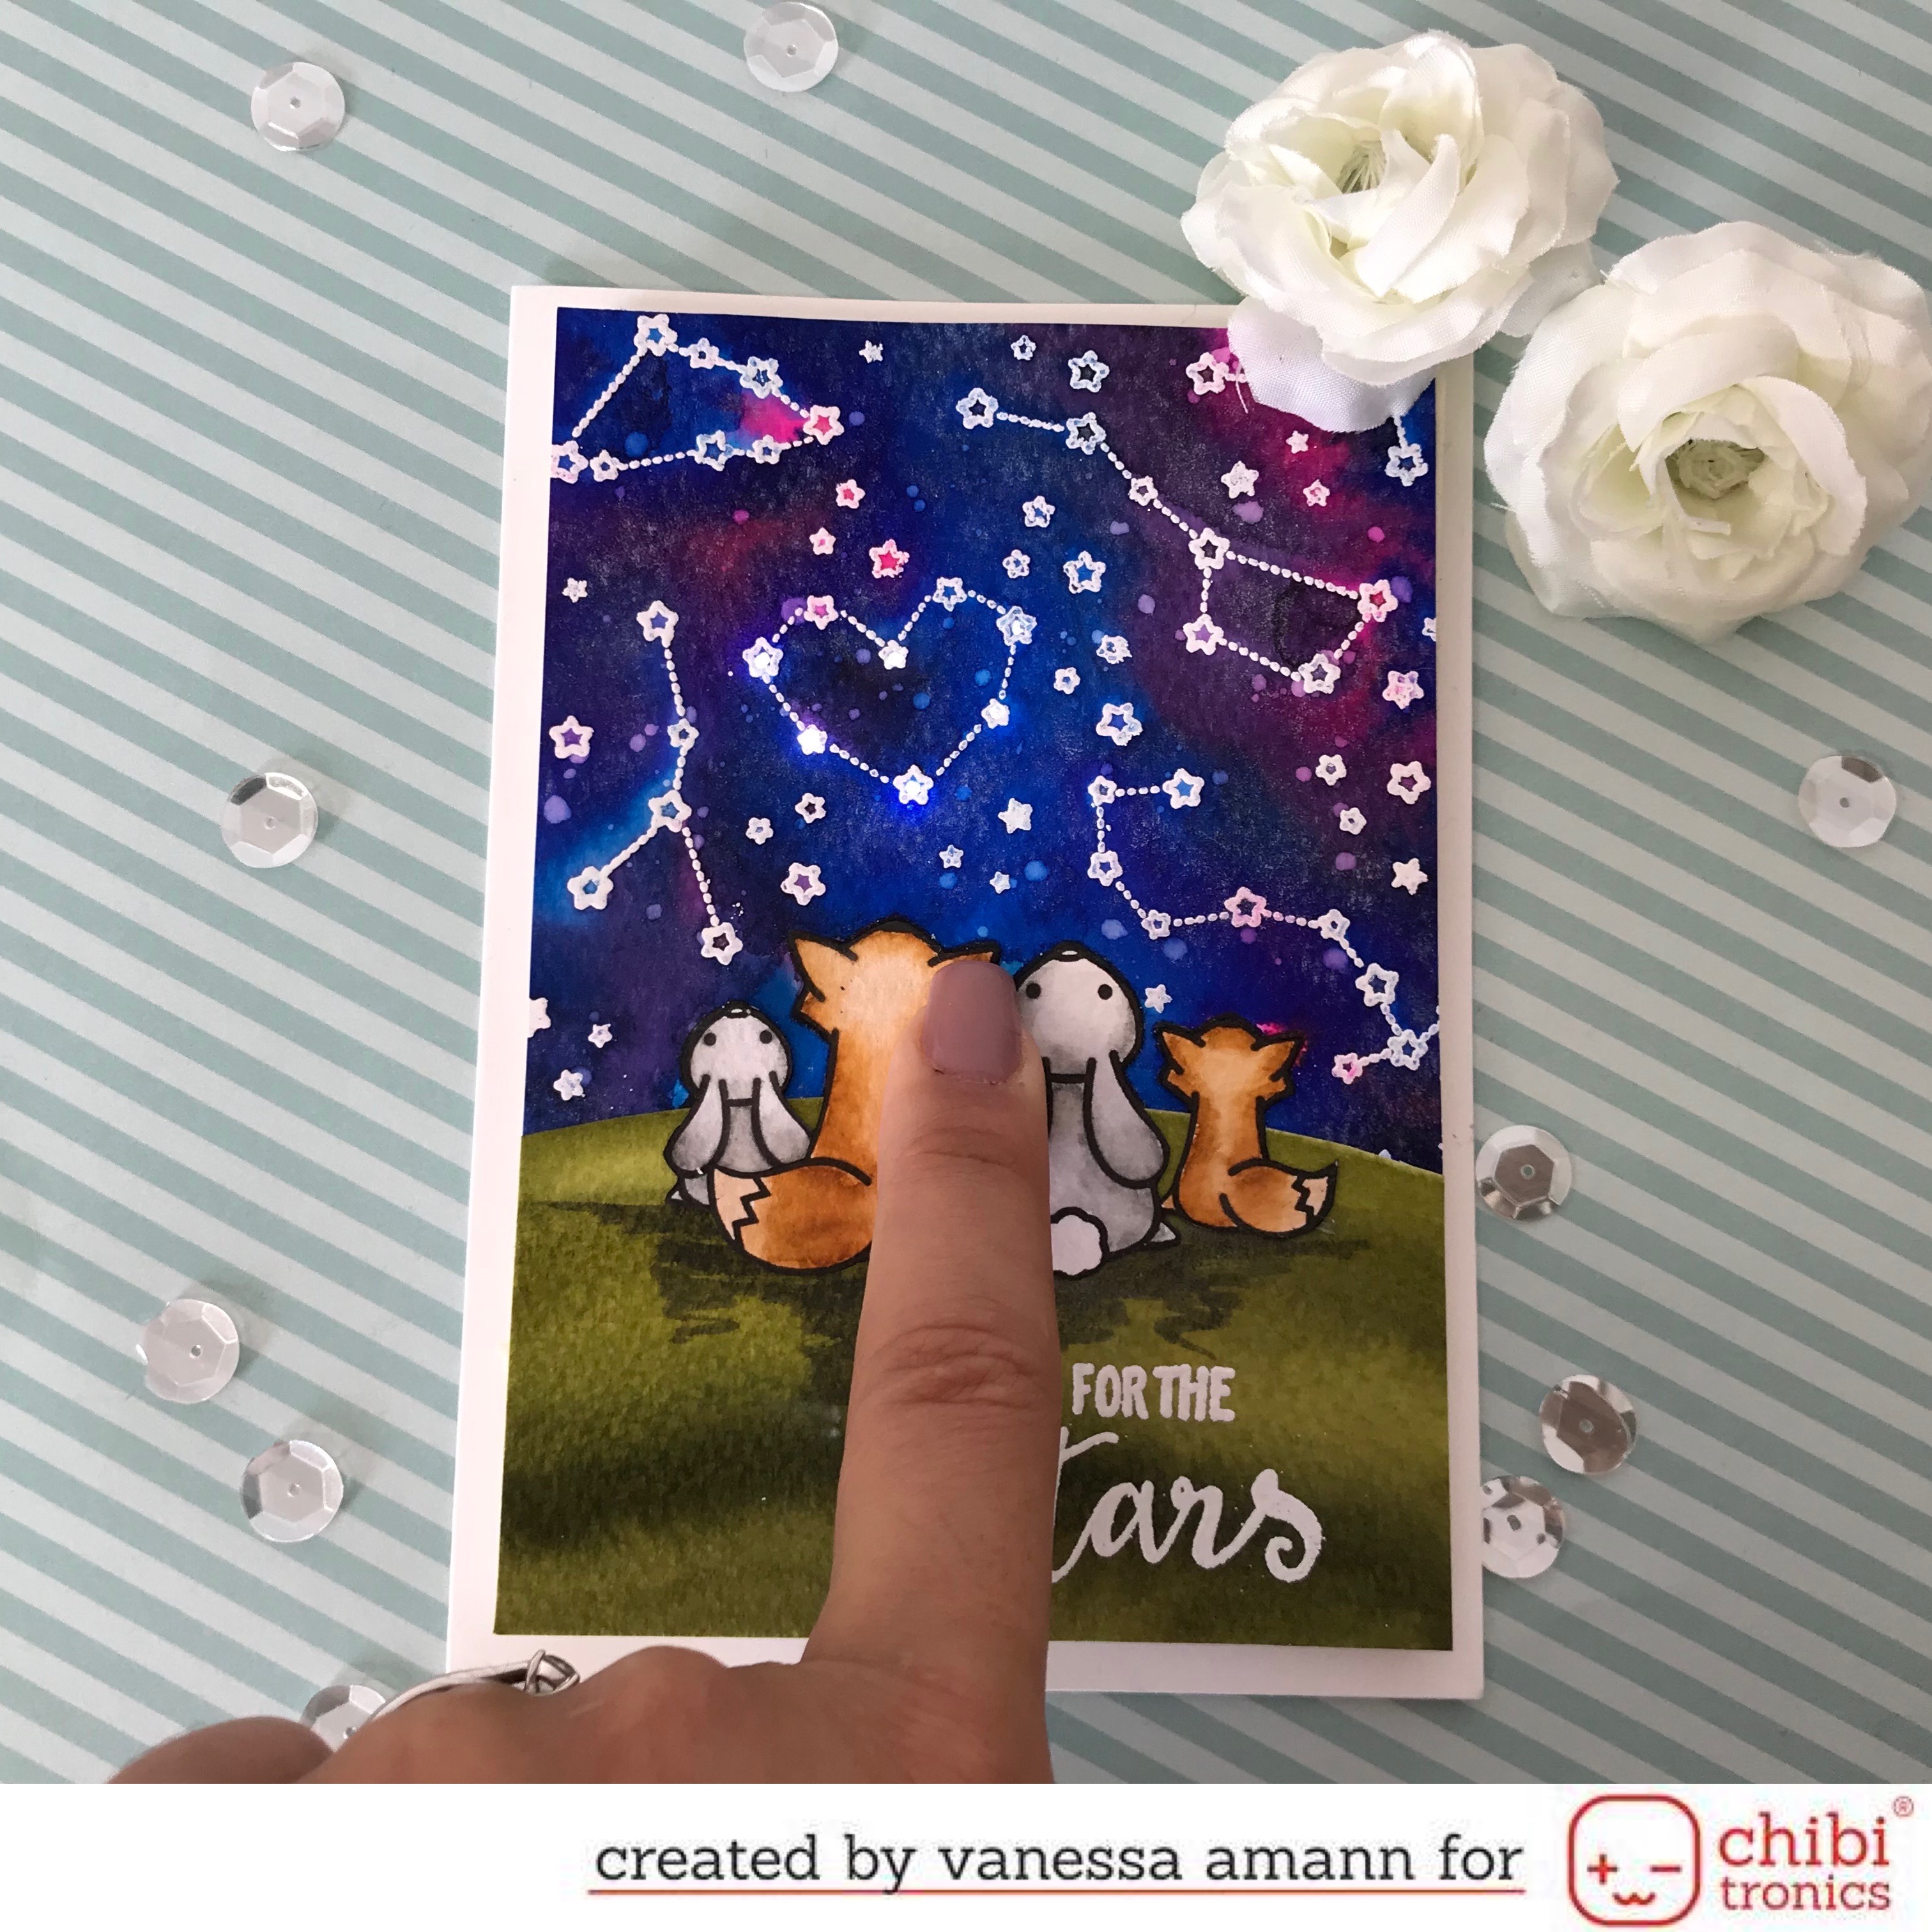
Reach For The Stars- LED CARD

Hello crafty people,

today I´m back with a new video tutorial using stamps from Lawn Fawn. For long time I wanted to use the upon a star set, but it never fit. But In case I would find an opportunity to use this set, I already knew what I wanted to create. I wanted to create a night sky background, with white heat embossed stars and star signs and the critters sitting on top of a hill looking for the amazing sky. And so it happens and I had the idea to create a shining star sign.


For creating this card I did the following steps and it one of the easiest shining cards I´ve ever made. Perhaps because I already knew about how to use this set. In case my written descriptions isn't enough, please watch the associated video:
  • I stamped the star and star sign images all over the card panel using a sticky ink pad, scatter white embossing powder over the images and heat set it. But don't forget to using something to take away the static, so the embossing powder only sticks to where you have stamped
  • To create my night sky I scribbled some Spectrum Noris Sparkles Pens and spray some water on top. I was surprised that the colors blended so well and created an amazing and so realistic looking look
  • I Stamped with a water proofed black ink pad on watercolor paper and colored my images using the Zig Real Color Brush Pens. I´m sorry, I totally forgot to write down the colors and now I can't remember. To blend the colors I used a dark shade, a middle one and used a watercolor brush to blend it out. After coloring I fuzzy cut all the images.
  • I scribbled a dark green and a middle green on watercolor paper and blended it out with my watercolor brush and created a hill shape. I fuzzy cut it also.
  • I glued my hill and my images on my card panel and gave the images some shadow underneath them. I wanted it to look more realistic.
  • Now to the technical part: the supplies you need for are white LED Stickers, Coppertape and a battery. You can find them on the Chibitronics Starter Kit, or buy everything individually. First I had to decide which stars should shine. The ones supposed to shine I pierced with a craft knife. I used a pen to draw in the LEDs and batteries places. Then I used my stencil to draw in the LED stickers. Now probably the most trickiest part, but just because the shining image is so tiny: connect the battery and the LEDs using copper tape. As the place where the stickers are is so tiny, I simply created two circuits, I wanted to avoid that accidentally plus and minus would cross and the card wouldn't shine. (I´m sorry, in case the explanation is bad, just look the video ;) )
  • At the end I covered everything with two layers of foam tape and taped it to a black card base. I didn´t add something more to the card because a) the card is shining and b) the Sparkle pens created so much glitter, I did´t want to overpower this card.

So this was my idea for today and I hope you enjoyed this card. In case you never tried making a LED card, I think this card would be perfect to start with. I just would reduce the amount of shining starts to perhaps three and creating the circuit would be much easier as it has been already. Try it ;) I wish you all a good weekend and until the next time,


Batterie Batterie
Chibitronics  Starter Kit
Chibitronics  LED white
Chibitronics  Cuppertape
Fiskars  Schneidebrett
Foam Tape 3M
Folia Bonefolder
Folia Watercolor paper
Folia Acrylblöcke
Folia Bastelskalpell
Kuretek Zig Real Color Brush Pens
Lawn Fawn Starry Skies
My Sweet Petunia MISTI Tool
Scotch 3M Tape Glider
Spectrum Noir Sparkles Vintage Hues
Spectrum Noir Sparkles Winter Warms
Tim Holtz Tonic Trimmer
Versafine Onyx Black
Versamark Watermark Ink
WOW Embossing Opaque White Embossing Powder


Mermaids Pop-Up Card

Hallo ihr Lieben,

heute bin ich nur kurz zurück. Ich habe die Karte für die MFT Superstar Challenge gebastelt. Leider bin ich nur gerade so fertig geworden diese Karte zu posten und das Video hoch zu laden. Leider musste ich das Video zwei Mal besprechen, weil ich es nicht gespeichert hatte. Das passiert einem aber auch nur, wenn man keine Zeit hat. 


Bei dieser Karte handelt es sich um eine Pop-up Karte. Das bedeutet, wenn man die Karte öffnet, dann öffnet sich diese Szene hier (unteres Bild). Ich habe die Karte so gestaltet, dass sich die Szene von außen, im Inneren der Karte widerspiegelt. Und ich finde, das ist mir ganz gut gelungen. Eine genaue Anleitung findet ihr hier unten:


Das wars dann auch schon wieder für heute. Bitte drückt mir die Daumen! Ich wünsche euch dann schon Mal ein schönes Wochenende und bis ganz bald wieder :) 


Material/ Supplies:

Create a Smile Acrylblöcke Ranger Multi Matte Medium
EK Success Powder Tool Scotch 3M Tape Glider
Folia Bonefolder Sizzix BigShot
Kuretek Wink of Stella Tim Holtz Tonic Trimmer
Label Ocean Acetate Tim Holtz Distress Oxide Broken China
Lifestyle Crafters Quick Stick Tool Tim Holtz Distress Oxide Faded Jeans
Memento Tuxedo Black Versamark Watermark Ink
My Sweet Petunia MISTI Tool WOW Embossing Opaque White Embossing Powder
Neenah Solar White Paper Ultra Heavy My Favorite Things Mermaizing


Card for you - Zig Real Color Brush Pens - Warum sie gut sind

Hallo ihr Lieben,

heute bin ich zurück mit dieser floralen Karten, die sich auch perfekt für den Muttertag eignet. Diese Karte wurde inspiriert von Yana Smakula. Diese Karte habe ich auf Bristolkarton von Folia mit meinen Zig Real Color Brush Pens gemalt. In dem Video erzähle ich euch einiges über die Stifte. Unter anderem zeige ich euch, wie ich sie verwende, gleichzeitig habe ich noch ein Video zur lieben Birka verlinkt, in dem sie euch zeigt was alles möglich ist. Außerdem erzähle ich euch ein paar der Vorteile, da ich oft gefragt werde, ob man Copics und Zigs vergleichen kann, und welches der beiden besser ist.


Zig Real Color Brush Pen Copic Marker
auf Wasserbasis auf Alkoholbasis
man benötigt weniger Stifte, da man mit Wasser verblenden kann man benötigt mehr Stifte, um besser verblenden zu können. Ich würde vorschlagen 2-3 Stifte pro Farbfamilie.
deshalb ist die Anschaffung zu Beginn auch günstiger deshalb die Anschaffung etwas teurer  ist
Kosten: es gibt 4er, 6er, 12er, 24er, 48er, 60er und 80er Packungen. Die Stifte gibt es auch einzeln, da sind die Stifte natürlich teurer. Den Kauf der Multipacks empfehle ich bei Amazon.

Ich habe mit dem 24er Pack angefangen. Dann hatte ich den 48er und nun den 60er. Mehr brauche ich auch (noch) nicht ;) 
Kosten: hier lohnt es sich nicht Packungen zu kaufen, da der pro Stift Preis nicht günstiger wird. Ich empfehle es die Stifte im Zeichencenter Ebeling zu kaufen. Dort müsst ihr euch im Copic-Club anmelden (kostet 1€ im Jahr), dafür bekommt ihr aber super Staffelpreise. Alternativ bei Cultpens. Dort ist allerdings Versand aus England.
Man muss nicht viel vom Malen verstehen, der Hell-Dunkel-Kontrast entsteht durch da Verblenden mit Wasser fast automatisch. Man muss sich vor dem Kaufen nicht viele Gedanken machen Da man mit mehreren Stiften verblenden muss, sollte man sich vorher genau erkundigen, welche Stifte gut zueinander passen, und welche nicht. Hierzu kann ich nur die Hex-Chart von Sandy Allnock empfehlen. Im Allgemeinen sind die Vorbereitungen vor dem Kauf nur wärmstens zu empfehlen.
Das Malen mit Wasserbasierten Medien verzeiht einem eher Fehler Man sollte sich damit auseinander setzen, wie die Stifte sich verblenden und Fehler werden nicht so schnell verziehen


Eigentlich habe ich nicht viel über die Karte selbst zu sagen. Ich schlage vor, dass ihr euch das Video anschaut. Dort kann man am besten sehen was ich genau gemacht habe. Wie immer hoffe ich, dass euch mein Beitrag, und die Karte gefallen haben und wir sehen uns das nächste Mal wieder. 


Clearly Besotted Stamps Love Quotes II- retired My Favorite Things  Blueprints 27
Create a Smile Acrylblöcke My Favorite Things  Stitched Circle Stax
Create a Smile Dekorierte Grüße- bunte Erweiterung My Sweet Petunia MISTI Tool
Folia Bonefolder Scotch 3M Tape Glider
Folia Acrylblöcke Sizzix BigShot
Folia Bastelskalpell Tim Holtz Tonic Trimmer
Folia Papier Schwarz Versafine Onyx Black
Folia Schere Versamark Watermark Ink
Folia Bistrolpapier WOW Embossing Opaque White Embossing Powder
Herma Removable Label Herma Removable Label Fiskars  Schneidebrett
Kuretek Wink of Stella Kuretek Zig Real Color Brush Pens

Waving happy birthday! - Video

Hallo ihr Lieben,

heute bin ich zurück mit einem Set Geburtstagskarten. Außerdem möchte ich an der zweiten Lawnfawnatics Challenge teilnehmen. Das Thema dieses Mal ist interaktive Karten. Deshalb habe ich mich dazu entschieden ein paar Schüttelkarten zu gestalten. Dieser Kartentyp ist fast mein Liebling, da die Beschenkten sich am meisten freuen, egal ob Groß, oder Klein!

Hello crafty friends, 

today I´m back with a set birthday cards. I also wanted to play along with the second Lawnfawnatics challenge, which is all about interactive cards. So I decided to create shaker cards, also because people who receive this card are always excited, equally whether big or small one. 


Da ich zu dieser Karte ein Video erstellt habe, werde ich hierzu nicht viel schreiben. Ich bin immer der Meinung, dass man es im Video besser sehen kann. Ich wünsche euch allen einen tollen Sonntag, frohe Ostern und wir sehen uns beim nächsten Mal wieder!

As I´ve created a video about this card I won't tell you much about it. I always think you see it better in the videos. I wish you all a great Sunday, happy easter and until the next time!


Copic Marker Copic Marker Pretty Pink posh Sparkling Clear 4mm
Folia Bonefolder Pretty Pink posh Sparkling Clear 6mm
Folia Acrylblöcke Pretty Pink posh Sparkling Clear Seed Beads
Folia Schere Ranger Multi Matte Medium
Folia Bistrolpapier Scotch 3M Tape Glider
Kuretek Wink of Stella Sizzix BigShot
Label Ocean Acetate Stampin Up Whisper Whiter
Lawn Fawn Mermaid for you Tim Holtz Mermaid Lagoon
Memento Tuxedo Black Tim Holtz Ink Blending Tool
My Favorite Things Inside & Outside Stitched Rectangles Tim Holtz Antique Linen
My Favorite Things  Blueprints 27 Tim Holtz Tonic Trimmer
WOW Embossing Opaque White Embossing Powder Versamark Watermark Ink


Shine bright like a diamond

Hallo ihr Lieben,

heute bin ich zurück mit einer Karten und passendem Video. Dieses Mal habe ich eine Karte zu zwei Challenges von Krumsprings Spring Festival dabei. Ich möchte an der Rainbow und an der Triangle Challenge teilnehmen. Viel mehr werde ich jetzt auch nicht schreiben, da alle wichtigen Informationen im Video zu sehen sind. Ich wünsche euch ganz viel Spaß und bis bald.

Hello fiends,

today I´m back with a card (and including a video) for two challenges from Krumsprings Spring Festival. One challenge is about rainbows and the other is about triangles. I catchen both ;) 
I dont have to tell you a lot about this card because it was pretty easy and you can see all steps and important informations in the video. I hope we will see us soon and until the next time have a wonderful day.


Krumspring Stamps Shine Bright Like A Diamond My Favorite Things  Blueprints 27
Create a Smile Acrylblöcke Ranger Multi Matte Medium
Folia Bonefolder Scotch 3M Tape Glider
Folia Fun Foam/ Moosgummi Sizzix BigShot
Folia Acrylblöcke Tim Holtz Cracked Pistachio
Folia Vellum Tim Holtz Spun Sugar
Folia Schere Tim Holtz Picked Raspberry
Folia Doppelseitiges Klebeband 5mm Tim Holtz Peacock Feathers
Incadincado Embossing Bag Tim Holtz Blueprint Sketch
Lifestyle Crafters Quick Stick Tool Tim Holtz Wilted Violet
Mondi Color Copy Tim Holtz Tonic Trimmer
Versamark Watermark Ink

Winter Ski Scene- Christmas Card Series #6

Hallo ihr Lieben,

leider bin ich mega verspätet und es tut mir unendlich leid. Ich habe auch beschlossen, dass ich nur  noch zwei (auf jeden Fall. Vielleicht schaffe ich auch noch ein extra!) Posts hochladen werde bis Weihnachten, mehr schaffe ich einfach nicht. Auch die Videos sind nun sehr abgespeckt- nämlich ohne Voice-over. Voice-over dauert einfach zu lange. Trotzdem wird es natürlich weiterhin das Gewinnspiel geben. Außerdem werde ich euch mehr Karten auf Instagram posten, dort ist es einfacher für mich ;) Deshalb werde ich heute auch nicht zu viel über meine Karte verraten, denn das Video tut es bereits ;) Viel Spaß und bis morgen!

Hello friends,

I have to apologies! I´m so late with this post and video. But earlier wasn´t possible. I decided, that there will be only two more posts (perhaps I get a third one, but this is just an extra!), because more won't be possible for me. And also the videos are slimmed down- without voice over. Voice over take me so much time and I can´t handle. But the give away will be still running and there will be one more video. I will show you more cards on Instagram. I think there is nothing more to say, because there is a video for you. So, we will see us tomorrow for a new post.


Die Cuts And More - Päckchen


Hallo ihr Lieben,

wie ihr sicherlich schon mitbekommen habt bin ich nun Design Team Mitglied bei Die Cuts And More. Heute kam auch endlich mein Päckchen an, und ich habe gleich mal ein Unboxing Video gemacht. Da ich keine puren Unboxing Videos mag, gibt es oben drauf noch ein kleines Obolus: ich zeige euch wie ich mein Stampoholic fertig zum Basteln mache und zudem meine neuen Sachen aufbewahre. Ich wünsche euch also ganz viel Spaß und bis bald zum nächsten Mal.


Material/ Supplies:
Die Cuts And More Stampoholic regular Die Cuts And More Stripes Basket Weave Background Die
Die Cuts And More Pretty in Pink Sequins Die Cuts And More Congrats Word Die
Die Cuts And More Ultra Shine Fruit Punch Mix Die Cuts And More Grid Paper
Die Cuts And More Clrystal Clear Dymo Letratag
Die Cuts And More Sexy Word Die Dymo Papierband
Die Cuts And More Seriously Word Die Dymo Transparentband
Die Cuts And More You Word Die Tim Holtz Tonic Trimmer
Die Cuts And More Double Stitched Heart Dies Folia Washi Tape
Die Cuts And More Shaker Tag Dies Darice Storage Solution
Avery Elle  Stamp Pockets Hama CD Aufbewahrung
MerkenMerken

Stimmungsaufheller- Video

Hallo ihr Lieben,

lange ist es wieder her, dass ich hier gepostet habe und dass ich ein Video gemacht habe ist noch länger her. Es war ein bisschen stressig mit der Uni. Ich hatte kurz Zeit um Luft zu holen, dabei ist dieses Video entstanden.

Long time no see,

but I´m back again. And today not only with a post but also with a video. I had some trouble with studying but now I have time to breath a bit and this is what happened (=


Christine, von Create a Smile, hat neue Stempel heraus gebracht, die sich perfekt für LED-Karten einigen. Da musste ich direkt auch wieder eine machen.

Dear Christine from Create a Smile brought out some great stamp sets for making  LED cards, so I had to make one using my new goodies. 


Viel mehr werde ich auch nicht schreiben, da alles gut in dem Video erklärt ist. Wenn euch das Video gefällt, bitte hinterlasst mir einen Daumen nach oben. Ich hoffe wir sehen uns bald wieder und ich wünsche euch allen ein schönes Wochenende :) 

I won't write anything more because everything is explained well in the video. I hope you like it and if yes, please leave me a thumbs up and I hope to see us soon. For all of you a happy weekend :) 


Copic Marker Copic Marker Stampin Up Schere
Create a Smile Acrylblöcke Tesa Sekundenkleber
Foam Tape 3M Tesa Tesafilm
Folia Bonefolder Tim Holtz Tumbled Glass Ink
Folia Papier Schwarz Tim Holtz Mermaid Lagoon
Incadincado Embossing Bag Tim Holtz Ink Blending Tool
LEDs LEDs Tim Holtz Chipped Saphire
Memento Tuxedo Black Tim Holtz Peacock Feathers
Mondi Color Copy Versamark Watermark Ink
Pretty Pink posh Sparkling Clear 4mm WOW Embossing Opaque White Embossing Powder
Pretty Pink posh Sparkling Clear 6mm Sizzix BigShot
Ranger Multi Matte Medium Abstandklebeband Transparent Abstandklebeband Transparent
Scotch 3M Tape Glider Ranger Perfect Pearls
Create a Smile Strahlende Küste Create a Smile Double Stitched Rectangles


MerkenMerken

Happy Insta Girls Oster Blog Hop - Video

Hallo meine Lieben,

es ist wieder so weit- es ist Blog Hop- Zeit. Und wie könnte es auch anders sein, als unter dem Motto "Ostern". Vielleicht fragt ihr euch "wer ist das" und "was machen die"?! Eigentlich sind wir nur bastelwütige die sich dank unserer Insta (Instagram)-Mama Birka gefunden haben. Seit je her machen  wir zu gegeben (und nicht gegebenen) Anlässen einen Blog hop. Ein wirkliches "warum" gibt es nicht :D Dieses mal wurde ich von der Lieben Wiebke  gezogen.. und schaut mal was sie mir geschickt hat. Ist das nicht süß? 

Hello everybody,

we did it- a blog hop. This time.. how could it be otherwise.. it is a easter blog hop. May you ask yourself "who are they?!" and "why do they do this?!". I´ll answer: Birka, is our , I call her lovely, Insta (=Instagram)- mother. She found us on Instagram and we build a group who decided to make these blog hops just for fun. Yes.. FUN! So, this time I got the card from the lovely Wiebke  :) Look how cute is that? 


Wie bereits erwähnt ist dieses Mal das Thema Ostern dran. Aber nicht nur das, sondern wir mussten auch noch etwas in der Karte verstecken. Habt ihr´s schon entdeckt?

And now about the hop: this time the hop isn't just easter themed, we had the challenge to hide something in the card. As on easter you always (here in german) have to seek you goodies. Did you find the hidden?


Ich werde auch nicht viel über die Karte schreiben, da ich dieses Mal ein Video dazu gedreht habe. Bitte verzeiht mir jeden Fehler, den ich mache, denn es ist mein aller erstes Video und Englisch ist ja auch nicht meine Muttersprache. Wenn euch das Video gefällt, dann hinterlasst mir bitte einen Kommentar oder einen Like-Daumen :)

I don´t want to tell a lot about the card because this time I made a video. Please forgive me EACH error, this was my first video and english isn´t my mother language. If you like it and want me to make more videos so please leave a comment or a thumbs up :)


Das war´s jetzt auch zu meiner Karte, bitte Hoppe weiter zu nächsten Karte :)
So, you saw everything about my Card, please go to the next stop :) 

nächster Halt-> Birka <- next stop
Lisa    
Nina   
Dana 
Reni  
Vanessa 

Material:
Paper: Stampin Up (whisper white)
Die: My Favorite Things (stitched rectangle)
Glue: Tomboy (multi medium), Rager (multi matte medium), ATG Scotch roll
Sequins: Pretty Pink Posh (sparkling clear)
Distress Inks: Tim Holzt 
Die: Lawn Fawn (grassy die border)
Stamp Set: Clearly Besotted Stamps (chirpy chicks)
Stamp Set: My Favorite Things (adorable elephants)
Die: Clearly Besotted Stamps (eggs- retired)
Foam Tape, Scissor, Acryl Blocks (Create a Smile Stamps), Memento tuxedo black ink, Falzbein