Posts mit dem Label create a smile werden angezeigt. Alle Posts anzeigen

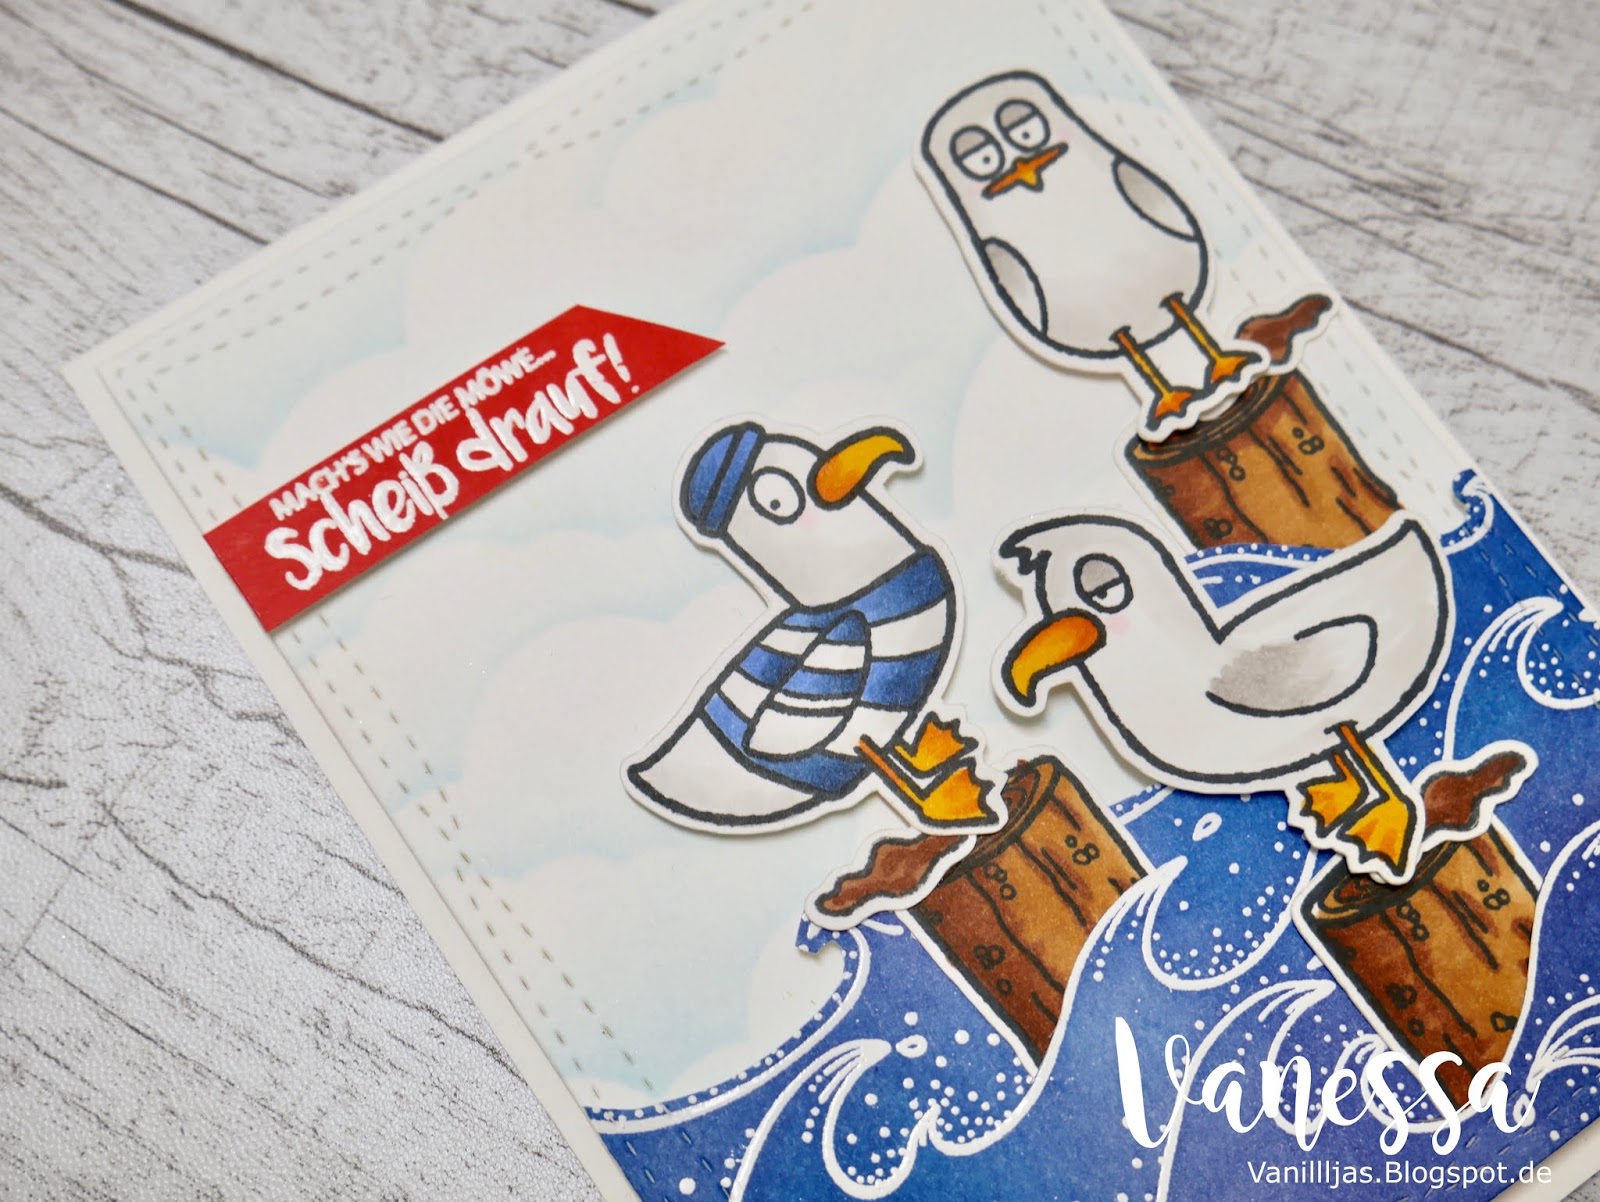
Mach's wie die Möwe und scheiß rauf!

Hallo ihr Lieben,

heute gibt es einen kurzen und schmerzlosen Post von mir. Mal wieder die Zeit, die Zeit, die Zeit. Aber auf dem Bastelwochenende habe ich die Chance bekommen die Juni-Release-Stempel von Create a Smile auszuprobieren und da wollte ich noch rechtzeitig meine Inspiration zeigen!


Anlass für diese Karte war mein Arbeitskollege, denn er hatte Mitte Mai Geburtstag und hat seinen 50sten gefeiert. Sein Motto war Nordsee und als ich die Möwen von Christine gesehen habe bin ich vor Glück ausgeflippt. Ich wusste direkt, das diese Karte der Knaller wird. Sie kam auch wirklich sehr gut an bei ihm! Ursprünglich war die Idee, dass die Möwen noch auf eine 50 scheißen, aber leider hatten wir keine geeignete 50 im Kloster dabei ;) Aber auch ohne war die Karte perfekt.


Die Karte war nicht schwer zu machen. Zu beginn habe ich meine Motive gestempelt und mit meinen Copic Markern ausgemalt. Im Kloster hatte ich den Luxus die Brother Scan and Cut zu testen und musste daher nicht selbst ausschneiden. Ich sag euch, die Investition lohnt sich! Nachdem die Möwen erledigt waren habe ich mich an meinen Hintergrund gemacht. Dafür habe ich aus Wolken Stanzen Schablonen geschnitten und bin mit Tumbled Glass Distress ink drüber gewischt. Das Mehr habe ich mit verschiedenen Blautönen gestaltet. Vorher habe ich den Wellenstempel von Create a Smile mit weißem Embossingpulver gestempelt und bearbeitet. Für die Baumstämme habe ich Schlitze in die Wellen geschnitten, sodass es wirklich ausschaut, als ob die Möwen im Wasser sitzen. Den Spruch habe ich ebenfalls mit weiß embossed, allerdings habe ich rotes Distress Ink Stempelkissen verwendet um das weiße Papier einzufärben. 

So, das war es auch mal wieder von mir. Ich habe hier noch ein paar Projekte die gezeigt werden wollen. Aber wie gesagt, leider schaffe ich im Moment nicht wirklich viel. 
Ich wünsche euch noch eine schöne Restwoche und bis ganz bald,


Here are the links for supplies I've used. Some of the links are affiliate links. They provide a little commission in case you buy products using my links with no extra costs for you. Products marked with (*) I generously received from the companies to use. 

FoliaBastelskalpell
Lawn FawnPuffy Clouds Border Die
MementoTuxedo Black
My Favorite Things Wonky Stitched Rectangle
My Sweet PetuniaMISTI Tool
Neenah SolarWhite Paper Ultra Heavy
Scotch 3MTape Glider
SizzixBigShot
Tim HoltzInk Blending Tool
Tim HoltzBlueprint Sketch
Tim HoltzChipped Saphire
Tim HoltzInk Blending Tool
Tim HoltzTonic Trimmer
Tim HoltzTumbled Glass Ink
TombowMono Multi 
VersamarkWatermark Ink
WOW EmbossingOpaque White Embossing Powder
Brother Scan n Cut


Slide Switch LED Card - Create a Smile Stamps Comeback Party!

Hello everyone,

I´m today over at the Create a Smile Stamps Blog to show you a light up card using some stamps from the new release and the Chibitronics Starter Kit. 

When I first saw the lampion Sets I knew I had to use it for a card that lights up. Long time ago I saw Jessica creating a card with a slider switch and I wanted to recreate it. This was the perfect opinion. 


Instructions:
  • Stamp the mole with Memento Tuxedo Black Ink on Copic friendly paper and color him in. I used E42, E44, E82 and E84 and  for the glasses I used B000 and the glas frame R39. Then fuzzy cut the image. 
  • Stamp all the lampion images on your panel in the way you want it to look like later. Then cut the lampions out and ink the panel and the grassy border in using distress inks (chipped saphire, mowed lawn, twisted citron) and distress oxides inks (wilted violet, faded jeans, broken china). At the end just spritz with some glitter spritz over the panel, so it would have a nice shine. 
  • Emboss the lampions on vellum and the sentiment in the card panel. And glue the lampions behind the cut part from the card panel. 
  • You have to create the circuit on the card base. It is a little bit hard to explain written but in the video it is explained in German and linked to the video from Jessica, who explained in English. 
  • To finish the card put everything together and give it a little finishing touch using sequins from Pretty Pink Posh. 


Tipps & Tricks: 

Creating LED cards can be tricky sometimes especially when the circuits are a bit complicated. It is helpful the create a sketch before making the card. 

I hope you found that tutorial helpful and you enjoyed this card. I wish you all a great Create a Smile welcome back event and hope to see you again soon.


Glückwunschkarten mit emboss-resist.

Hallo ihr Lieben,

heute bin ich zurück mit einem Glückwunsch Kartenset. Hierzu habe ich die watercolor lifting mit emboss resist Technik verwendet. Schon lange kenne ich diese Technik von Jennifer McGuire und leider hatte ich nie ein passendes Projekt dazu. Jetzt habe ich aber ein paar neue Stempel bei Create a Smile bestellt und da war so einiges passendes dabei.

Hello dears,

today I´m back with a congratulations card set. I´ve used the watercolor lifting technique with emboss resist. I know this technique from Jennifer McGuire for a long time but never had the matching project for. Know, I´ve ordered some Stamps from Create A Smile and there I had the perfect stamps. 

Im Video habe ich das glaube ich nicht richtig erklärt, deshalb hier nochmal:
Watercolor lifting mit emboss resist bedeutet, dass man die Aquarellfarben wieder reaktiviert. Da die Stempel embossed sind, widerstehen diese Stellen der Reaktivierung und sie sind dunkler als der Rest. Im Video ist das gut zu sehen.

Watercolor lifting with emboss resist means that we lift the watercolors. As we stamped the images with with VersaMark and heat embossed it the images can't be lifted anymore. 


Ich wünsche euch viel Spaß beim zusehen und wir sehen uns bald wieder.
I wish you lots os fun while watching the video and until the next time, I hope you have a wonderful day.


Create a Smile Acrylblöcke Tim Holtz Ink Blending Tool Foam Tape 3M
Create a Smile Mini Geburtstag Tim Holtz Twisted Citron Folia Bonefolder
Create a Smile Dekorierte Grüße- bunte Erweiterung Tim Holtz Peacock Feathers Folia Fun Foam/ Moosgummi
Create a Smile Clustered Leaves Tim Holtz Blueprint Sketch Folia Acrylblöcke
Pretty Pink posh Sparkling Clear 4mm Tim Holtz Wilted Violet Folia Papier Schwarz
Pretty Pink posh Sparkling Clear 6mm Tim Holtz Tonic Trimmer Folia Bistrolpapier
Pretty Pink posh Marshmallow 6mm Versamark Watermark Ink Incadincado Embossing Bag
Pretty Pink posh Marshmallow 4mm WOW Embossing Clear Gloss Scotch 3M Tape Glider
Ranger Multi Matte Medium Lifestyle Crafters Quick Stick Tool Stampin Up Whisper Whiter
Ranger Perfect Pearls My Sweet Petunia MISTI Tool Versafine Onyx Black


Du bist ein seltenes Pflänzchen

Hallo ihr Lieben,

leider lässt der Stress zur Zeit einfach nicht nach. Ich bin viel am Arbeiten und dann wieder bisschen am Lernen. Aber gut. Gestern blieb ein bisschen Zeit zum basteln. Außerdem muss ich gestehen, dass ich schon ein bisschen in den Weihnachtsvorbereitungen stecke :) Aber ich werde euch jetzt noch nicht damit belästigen :D

Hello lovelies,

I´m really sorry for the poor crafting time at the moment. But I´m working a lot right know and have to study a bit. But yesterday I had a little crafting time. I will be honest to you: I started making christmas crafts :D but I don't want to bother you with christmas already, so I will post this things later this year. 


Gestern habe ich diese Karte für die aktuelle Create a Smile challenge gestaltet. Create a Smile hat einmal monatlich eine Challenge die jedes mal unter einem anderen Thema läuft. Dieses Mal ist alles über das Thema "blau". Eigentlich wollte ich dazu eine Unterwasser Karte gestalten, da ich es ziemlich einfach fand. Aber so einfach wie gedacht war es dann doch nicht. Dann musste ich wieder neu überlegen, da ich nicht die Weihnachtsstempel auspacken wollte für dieses Projekt. Irgendwann kam ich darauf meine Krokusse auszupacken. Nachdem ich diese dann ausgewählt hatte ging das basteln irgendwie wie von ganz alleine :)
Yesterday I did some crafting for the running Create a Smile challenge. They have a challenge each month with another theme. For the month of august the challenge is all about "blue". I thought a lot about what I wanted to do. First I did an underwater scene, but it didnt worked well for me. I thought it would be easier, because under water most of the things are blue. But I had to switch and didn´t wanted to use my christmas stamps at this project. So I thought I´ll use my crokisses here and it worked really well. After I had this idea making the card was so easy and fast. 


So, und wie immer hoffe ich doch, dass euch diese Karte gefallen hat, und wir uns ganz bald wieder sehen zu einem neuen Projekt. Habt noch einen schönen Sonntag (:

And the same procedure as everytime. It hope you liked my project and I hope we´ll see us soon. Have a nice Sunday :)


Copic Marker Copic Marker Pretty Pink posh Sparkling Clear 6mm
Create a Smile Kroküsse Pretty Pink posh Droplets 4mm
Folia Fun Foam/ Moosgummi Ranger Multi Matte Medium
Folia Acrylblöcke Ranger Perfect Pearls
Kuretek Wink of Stella Scotch 3M Tape Glider
Memento Tuxedo Black Sizzix BigShot
Mondi Color Copy Stampin Up Schere
My Sweet Petunia MISTI Tool Tim Holtz Tumbled Glass Ink
Pretty Pink posh Sparkling Clear 4mm Tim Holtz Ink Blending Tool
Tombow Mono Multi  Tim Holtz Blueprint Sketch


Fühl dich umarmt.

Hallo Leute,

heute bin ich zurück mit einer Karte mit Produkten von Sunny Studio Stamps und Create a Smile. Die Flamingos habe ich schon vor einer Weile koloriert und konnte sie bisher noch nicht verwenden. Jetzt aber, und ich bin sehr froh darüber. Ich fand es toll die Flamingos so zu kleben, als ob sie sich umarmen würden. Und ich finde es einfach nur toll.

Hello people,

today I´m back with a sympathy card using stamps from Sunny Studio Stamps and Create a Smile. This flamingos were colored a while ago and I never used them. But finally I did. I thought it would be nice to glue them like they were hugging each other. And it turned out so beautiful.


Den Spruch von Create a Smile habe ich einfach auf Transparentpapier embossed und dank durchsichtigem Montageklebeband, welches ein bisschen dicker ist (ca. 1mm) auf die Palmenblätter geklebt. Die Palmen habe ich mit Distress Inks, Wasser und Pinsel angemalt.

The sentiment from Create a Smile were embossed on some vellum. Thanks to the transparency tape I´ve found, which has some dimension (1mm), I glued it on top of the palm trees. The palm trees I colored in with some Distress inks, water and a brush. 


Für den Hintergrund habe ich die selbe kolorier Technik verwendet wie bei den Palmen. Das verblenden der Farben gestaltete sich wirklich sehr einfach, da ich ganz viel Wasser verwendet habe und die Farben sich dadurch automatisch verblenden. Um die Karte abzurunden habe ich noch ein Paar Pailletten von Litte Things from Lucas Cards verteilt. Ich hoffe euch hat meine Karte für heute gefallen und wir sehen uns bald wieder.

For making the background I´ve used the same technique as I used for coloring in the Palm trees. Blending the colors together was really easy because of the amount of water I´ve used. To finish the card I´ve placed some sequins from Litte Things from Lucys Cards. I hope you liked my card for today and I hope were gonna see us soon.

Foam Tape 3M Stampin Up Schere
Folia Bonefolder Sunny Studio Stamps Tropical Paradise
Folia Acrylblöcke Tim Holtz Tumbled Glass Ink
Folia Bastelskalpell Tim Holtz Mermaid Lagoon
Folia Vellum Tim Holtz Peacock Feathers
Incadincado Embossing Bag Tim Holtz Shaded Lilac
Kuretek Wink of Stella Tim Holtz Blueprint Sketch
Lifestyle Crafters Quick Stick Tool Tim Holtz Wilted Violet
Little Things by Lucy I Love You Confetti Tim Holtz Mowed Lawn
Mondi Color Copy Tim Holtz Twisted Citron
Ranger Multi Matte Medium WOW Embossing Opaque White Embossing Powder
Scotch 3M Tape Glider Abstandklebeband Transparent Abstandklebeband Transparent
Kuretek Zig Real Color Brush Pens Create a Smile Double Stitched Rectangles
Versamark Watermark Ink Sizzix BigShot

MerkenMerken

Stimmungsaufheller- Video

Hallo ihr Lieben,

lange ist es wieder her, dass ich hier gepostet habe und dass ich ein Video gemacht habe ist noch länger her. Es war ein bisschen stressig mit der Uni. Ich hatte kurz Zeit um Luft zu holen, dabei ist dieses Video entstanden.

Long time no see,

but I´m back again. And today not only with a post but also with a video. I had some trouble with studying but now I have time to breath a bit and this is what happened (=


Christine, von Create a Smile, hat neue Stempel heraus gebracht, die sich perfekt für LED-Karten einigen. Da musste ich direkt auch wieder eine machen.

Dear Christine from Create a Smile brought out some great stamp sets for making  LED cards, so I had to make one using my new goodies. 


Viel mehr werde ich auch nicht schreiben, da alles gut in dem Video erklärt ist. Wenn euch das Video gefällt, bitte hinterlasst mir einen Daumen nach oben. Ich hoffe wir sehen uns bald wieder und ich wünsche euch allen ein schönes Wochenende :) 

I won't write anything more because everything is explained well in the video. I hope you like it and if yes, please leave me a thumbs up and I hope to see us soon. For all of you a happy weekend :) 


Copic Marker Copic Marker Stampin Up Schere
Create a Smile Acrylblöcke Tesa Sekundenkleber
Foam Tape 3M Tesa Tesafilm
Folia Bonefolder Tim Holtz Tumbled Glass Ink
Folia Papier Schwarz Tim Holtz Mermaid Lagoon
Incadincado Embossing Bag Tim Holtz Ink Blending Tool
LEDs LEDs Tim Holtz Chipped Saphire
Memento Tuxedo Black Tim Holtz Peacock Feathers
Mondi Color Copy Versamark Watermark Ink
Pretty Pink posh Sparkling Clear 4mm WOW Embossing Opaque White Embossing Powder
Pretty Pink posh Sparkling Clear 6mm Sizzix BigShot
Ranger Multi Matte Medium Abstandklebeband Transparent Abstandklebeband Transparent
Scotch 3M Tape Glider Ranger Perfect Pearls
Create a Smile Strahlende Küste Create a Smile Double Stitched Rectangles


MerkenMerken

Danke- Ihr Helden!

Hallo (=

Vor ein paar Monaten hatte ich euch ja bereits eine Karte für eigentlich eine Augenzeugin gezeigt. Diese Karte wurde nie versendet und die Zeit ist einfach weiter gelaufen. Jetzt ist mit dem Unfall aber alles geregelt und ich möchte beiden Augenzeugen danken. Ohne sie wäre ich auf dem Schaden sitzen geblieben.

Hello :)

3 months ago I told you I made a thank you card for a eyewitness. I never sent this card. But now everything about the crash is completed and I never forgot about both eyewitness. Without them I never had find the person who caused the crash. I decided to sent them a thank you card with a ice gift card in it. This is why the cards are all about ice. 


Im Moment ist alles ein bisschen stressig. Mir fehlen nur noch 3 Klausuren und die Bachelor-Thesis um mein Studium zu beenden. Daher muss ich mehr lernen und es bleibt leider weniger Zeit zum Basteln. LEIDER! Aber diese Karten mussten sein. Bald ist aber alles rum und ich hoffe ihr steht die Zeit mit mir durch!

At the moment everything is a bit stressing here, there are only 3 exams and my bachelor thesis until I´m finished. I want to pass everything and need more time learning. Unfortunately there isn't that much time for card making. But these cards had to be done! But luckily everything will be over soon. 


Material: 

Foam Tape 3M Ranger Multi Matte Medium
Folia Bonefolder Scotch 3M Tape Glider
Folia Acrylblöcke Sunny Studio Stamps Birthday Smiles Stamps
Folia Schere Tim Holtz Cracked Pistachio
Folia Vellum Tim Holtz Spun Sugar
Kuretek Wink of Stella Tim Holtz Twisted Citron
Lifestyle Crafters Quick Stick Tool Tim Holtz Peacock Feathers
Memento Tuxedo Black Tim Holtz Shaded Lilac
Mondi Color Copy Versamark Watermark Ink
My Sweet Petunia MISTI Tool My Favorite Things  Stitched Circle Stax


Beach Party Kit

Hallo ihr Lieben,

bereits am Donnerstag war das neue Beach Party Set von Create a Smile in meinem Briefkasten. Leider habe ich es erst am Wochenende geschafft damit zu spielen :) Als ich die Palme das erste Mal gesehen habe, habe ich direkt einen Schmetterling darin erkannt. Also los ging´s... Ausstanzen, zusammenkleben, einfärben, ausschneiden und tataaaa.. fertig :)

Hello lovelies :) 

this great beach party kit by Create a Smile arrived here already on Thursday but I could only play with it on Saturday. I saw the palm tree for the first time and in it I saw a butterfly. So I had to die cut,  glue, to distress ink and to cut the palm tree to get the butterfly out of it. And... tattaaaaa.. here it is :)


Wie ich euch ja bereits erzählt habe sind am Samstag nur Karten zu Wettbewerben und mit meinen neuen Produkten entstanden. Die Challenge für diese Karte findet ihr nur ganz exclusive in der Create a Smile Friends & Family Gruppe. Aber ich sag es euch, es ist es wirklich wert Teil der Gruppe zu sein!

I told you the cards I made on Saturday were all cards for challenges and with my new crafting supplies. This card will be part of the exclusive Create a Smile Friends & Family Group on Facebook. If you want to take part of this challenge you have to join in. But the group is really worth it! 


Den Hintergrund habe ich übrigens mal wieder mit der Ink smooching Technik gemacht. Ich liebe diese Technik. Ich liebe es, weil man selber nur schwer kontrollieren kann wie es hinterher aussieht und man sich einfach auf den Zufall verlassen muss :)

So, das wars auch schon wieder heute :) morgen geht es weiter mit der letzten Karte, die ich euch am Samstag gebastelt habe.

By the way, the background were created with my favorite technique, the ink smooching technique :) I love it so much because you haven't control over it and it is really coincidence how it turns out.

This was all for today. Tomorrow I will show you the last card I made on Saturday :) 


Create a Smile BeachParty Kit
Foam Tape 3M
Folia Fun Foam/ Moosgummi
Folia Acrylblöcke
Folia Papier Schwarz
Kuretek Wink of Stella
Lifestyle Crafters Quick Stick Tool
My Sweet Petunia MISTI Tool
Pretty Pink posh Sparkling Clear 4mm
Pretty Pink posh Sparkling Clear 6mm
Ranger Multi Matte Medium
Scotch 3M Tape Glider
Tim Holtz Ink Blending Tool
Tim Holtz Picked Raspberry
Tombow Mono Multi 
Tim Holtz Spiced Marmelade
Tim Holtz Mustard Seed


Video Sonntag: Eine Karte für dich

Hallo ihr Lieben,

heute zeige ich euch, wie man mit einfachsten Mitteln einfacher aber gleichzeitig sehr schöne Karten für jeden Anlass zaubern kann. Oft sieht man etwas, möchte es nach basteln und stellt fest, man hat nicht das passende Material. Dann ist es so, man schaut was benötigt wird, kauft alles ein und ist um viele Euros leichter. Ich habe heute mal Stempelkissen verwendet, die eigentlich nicht für diese Art von Technik (Aquarell) gedacht ist und habe es trotzdem versucht. Ich finde das Ergebnis kann sich sehen lassen.

Hello,

today I want to show you how to create a card with the simplest things you have. Sometime you see a card and you want to make it. often you don't have all the supplies. What do you do? The most of you would buy everything and then try to make the card. But try doing the card without these materials. Try to use your supplies how they weren't intended to. This is what I did here. I used this ink pads even if they are pigment inks for making aquarelle-styled card. And it worked!


Und noch etwas wollte ich euch zeigen: Wenn ihr einen Fehler macht, nicht direkt alles in die Mülltonne werfen, versucht das beste draus zu machen. Im Nachhinein wird es keinem mehr auffallen und man hat viel Material und Zeit gespart. Fehler sind menschlich und gehören dazu, denn schließlich sind wir keine Maschinen, und manchmal helfen sie uns noch besser zu werden ;) In diesem Sinne: Viel Spaß beim Video gucken und noch einen schönen 1. Mai.

And there is something more I want to show you. Crafter tend to be perfect and want to do everything perfect. When it comes to a mistake, often people simply throw everything away and start from the beginning. But not always there is a need to. Very often there is a chance to fix it. In this sense: have fun watching my video and me making mistakes :D Happy 1st May (Here in Germany it is a holiday)


Create a Smile Post Für Dich
Folia Bonefolder
Folia Watercolor paper
Folia Fun Foam/ Moosgummi
Folia Stempelkissen
Folia Acrylblöcke
Folia Bastelskalpell
Folia Schere
Incadincado Embossing Bag
Kuretek Wink of Stella
Neenah Solar White Paper Ultra Heavy
Paper Smooches Roses Wise Dies
Ranger Multi Matte Medium
Tombow Mono Multi 
Versamark Watermark Ink
WOW Embossing Opaque White Embossing Powder