Posts mit dem Label My Favorite Things werden angezeigt. Alle Posts anzeigen

Magical Day

Hello Chibitronic-fans :)

today I want to share with you this magical pullman slider switch card. First, I wanted to mentioned that at the beginning the card was planned as a regular LED card, with a push switch. But as I was creating my circuit I liked the idea of having a pullman slider switch and a hidden sentiment.


As always I created a tutorial for you. You can see HEREhow I created this card. I like doing the videos for you, as you always understand better how to create the card.
  • Stamp all the images on Neenah Solar White paper using Memento Tuxedo Black ink
  • Color all the images using Copic Markers (but for sure you could use what ever you want
  • Die cut the panel out of watercolor paper and ink blend the panel using Peacock Feathers, Wilted Violet and Blueprint Sketch Distress Ink. Splatter some waterdogs over the panel
  • Diecut another panel to create the circuit and create the regular circuit. Then you cut a strip of paper off, which goes trough one string (see picture below)
  • Take one piece of paper and cover it with copper tape. Then you fold it until it gets a star shape. The will work as a connector trough the missing part in the string.
  • Place the star shape in the cut out strip and tape it on a piece of paper. Mine was about 1" wide. This works as out pull tab. Other then I did in the video I would suggest to stamp the sentiment before glueing on the star shape.
  • Cover the circuit with a double layer of foam tape and tape it on the ink blended background we created.
  • The finished panel can now be taped on the cardbase.
  • Add all the critters, which were fuzzy cut and covered with clear Sparkle pen before.
  • I used some sequins from Lucys Little Things for finishing touches and then the card is all finished.


So, this was my card for today. I hope you enjoyed watching and reading how I created this card. I hope you've got inspired and I would like to see your project.
Vanessa


Here are the links for supplies I've used. Some of the links are affiliate links. They provide a little commission in case you buy products using my links with no extra costs for you. Products marked with (*) I generously received from the companies to use. 

Tim HoltzBlueprint Sketch
Tim HoltzInk Blending Tool
Tim HoltzPeacock Feathers
Tim HoltzWilted Violet
Tim HoltzInk Blending Tool
Tim HoltzTonic Trimmer
My Favorite ThingsMagical Day
ChibitronicsCuppertape
ChibitronicsPink, Orange, Green LED*
ChibitronicsStarter Kit
Studio KatiaOval Die
NeenahSolar White 80mg/m
Spectrum Noir SparklesClear Overlay
Copic MarkerCopic Marker
BatterieBatterie
MementoTuxedo Black
VersafineOnyx Black
VersamarkWatermark Ink
WOW EmbossingOpaque White Embossing Powder

Chibitronics & My Favorite Things Collaboration


Hey there, 

today I'm part of the My Favorite Things and Chibitronics collaboration blog hop. 
Over the course of today and yesterday (15th & 16th Feb), please head over to the chibitronics and MFT stamps blogs to start the hop and see all the inspiration.
If you hop along, please remember to leave a like and a comment – and then you can be in with a chance to win a Chibitronics starter kit or a $50 voucher to the MFT stamps store! What are you waiting for!?


Now, let's talk about my project. I saw this idea over at Tiffanys blog and the first time I saw the Somebunny I Love set, it was perfect for my idea. 
I started with stamping and coloring all my images. After coloring I fuzzy cut the images. I started then with stamping my bigger stars and the moon with Versamark ink pad, sprinkled with white embossing powder and heat set it. I stamped all these stars also with white pigment ink on black card stock. Then I stamped the remaining stars on the background and cut out the inner part of the bigger stars. Behind the stars I taped Vellum, so the lights would shine through. 

On the black cardstock I stamped the thinking bubble with white pigment ink and cut it out. Now I can start creating my circuit. It is a parallel circuit with six LEDs. The switch is behind the bunny. 


As Always, the trickiest part is putting the card together. This isn´t really tricky, but I always like to hide the thickness. So I cut out the place where the battery is on my clouds. 


I hope you enjoyed my collaboration project for My Favorite Things and Chibitronics. Please, don't forget to hop and to comment for a chance to win 50$ from MFT and a starter kit from Chibitronics. 

I hope you have a great day!


My Favorite Things Interactive Label*
My Favorite Things Somebunny I love*
Batterie Batterie*
Chibitronics  Cuppertape*
Chibitronics  LED white*
Chibitronics  Starter Kit*
Copic Marker Copic Marker
Fiskars  Schneidebrett
Foam Tape 3M
Folia Bastelskalpell*
Folia Bonefolder*
Folia Papier Schwarz*
Folia Schere*
Folia Vellum*
Incadincado Embossing Bag
Lawn Fawn Puffy Clouds Border Die
Memento Tuxedo Black
My Sweet Petunia MISTI Tool
Neenah Solar White Paper Ultra Heavy
Scotch 3M Tape Glider
Sizzix BigShot
Tim Holtz Blueprint Sketch
Tim Holtz Chipped Saphire
Tim Holtz Ink Blending Tool
Tim Holtz Tonic Trimmer
Tim Holtz Tumbled Glass Ink
Versamark Watermark Ink
WOW Embossing Opaque White Embossing Powder

Mermaids Pop-Up Card

Hallo ihr Lieben,

heute bin ich nur kurz zurück. Ich habe die Karte für die MFT Superstar Challenge gebastelt. Leider bin ich nur gerade so fertig geworden diese Karte zu posten und das Video hoch zu laden. Leider musste ich das Video zwei Mal besprechen, weil ich es nicht gespeichert hatte. Das passiert einem aber auch nur, wenn man keine Zeit hat. 


Bei dieser Karte handelt es sich um eine Pop-up Karte. Das bedeutet, wenn man die Karte öffnet, dann öffnet sich diese Szene hier (unteres Bild). Ich habe die Karte so gestaltet, dass sich die Szene von außen, im Inneren der Karte widerspiegelt. Und ich finde, das ist mir ganz gut gelungen. Eine genaue Anleitung findet ihr hier unten:


Das wars dann auch schon wieder für heute. Bitte drückt mir die Daumen! Ich wünsche euch dann schon Mal ein schönes Wochenende und bis ganz bald wieder :) 


Material/ Supplies:

Create a Smile Acrylblöcke Ranger Multi Matte Medium
EK Success Powder Tool Scotch 3M Tape Glider
Folia Bonefolder Sizzix BigShot
Kuretek Wink of Stella Tim Holtz Tonic Trimmer
Label Ocean Acetate Tim Holtz Distress Oxide Broken China
Lifestyle Crafters Quick Stick Tool Tim Holtz Distress Oxide Faded Jeans
Memento Tuxedo Black Versamark Watermark Ink
My Sweet Petunia MISTI Tool WOW Embossing Opaque White Embossing Powder
Neenah Solar White Paper Ultra Heavy My Favorite Things Mermaizing


Flying Hippo Circle LED - Chibitronics

Hello crafty people,

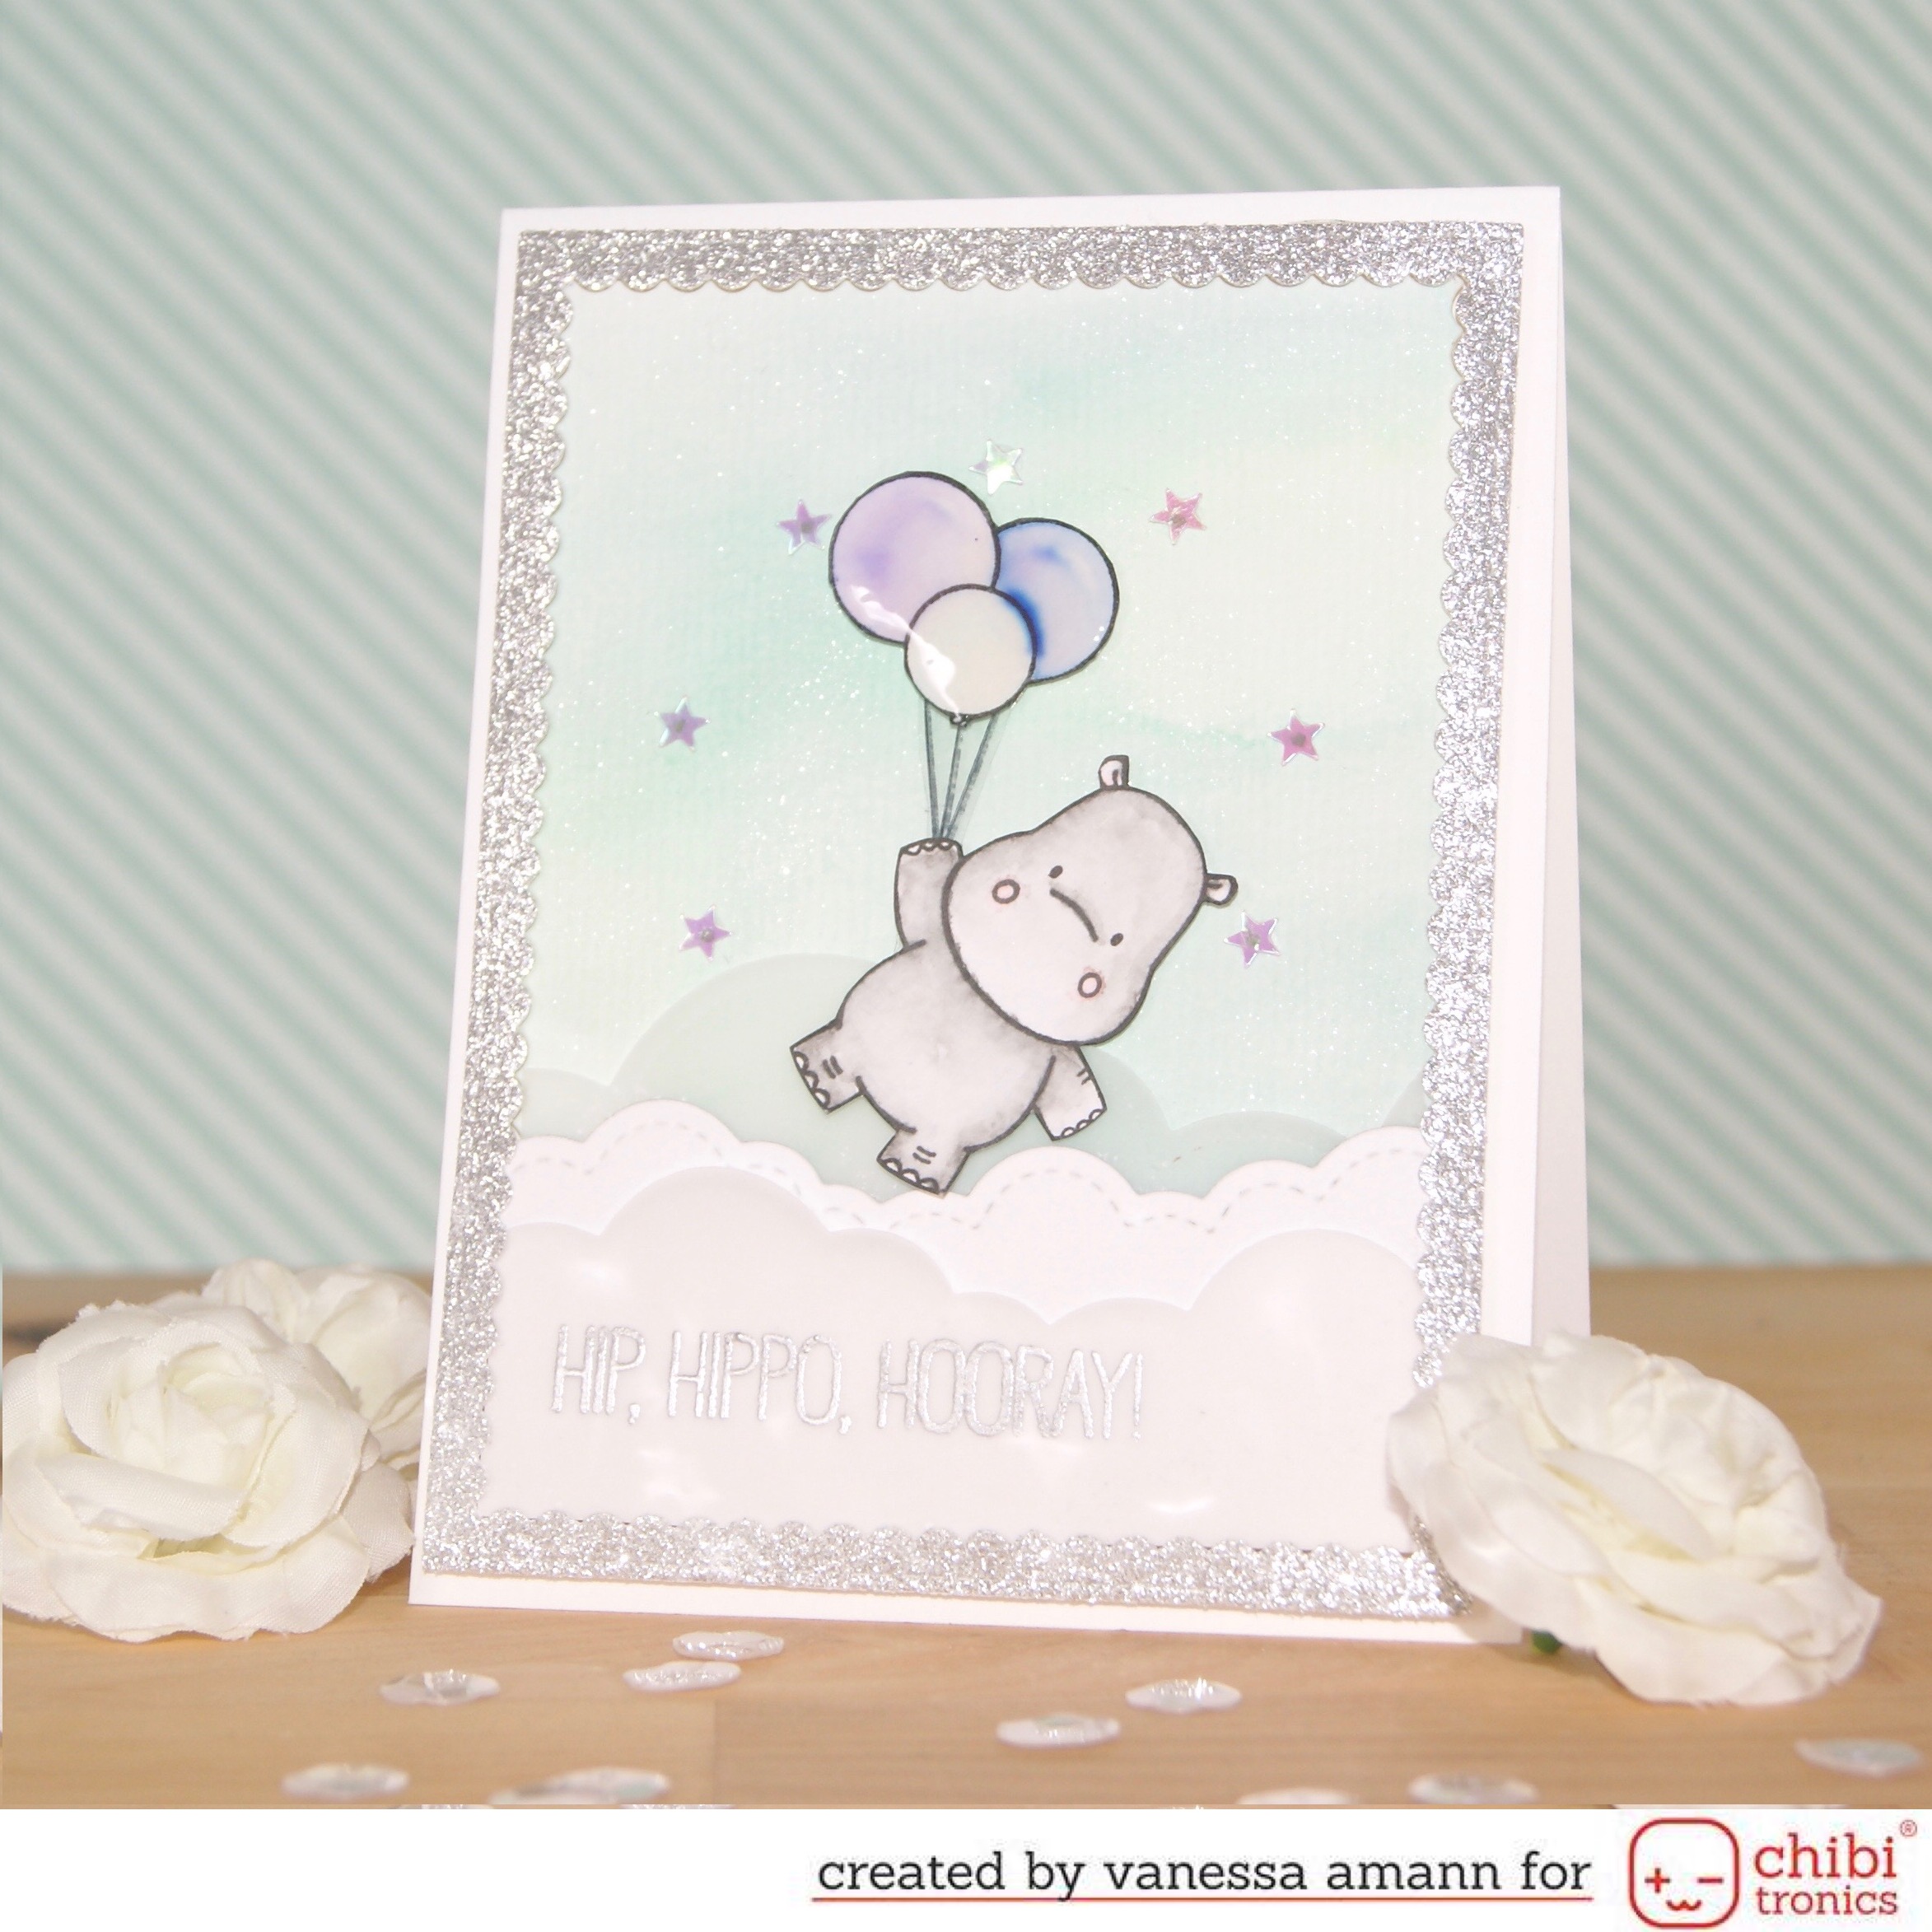
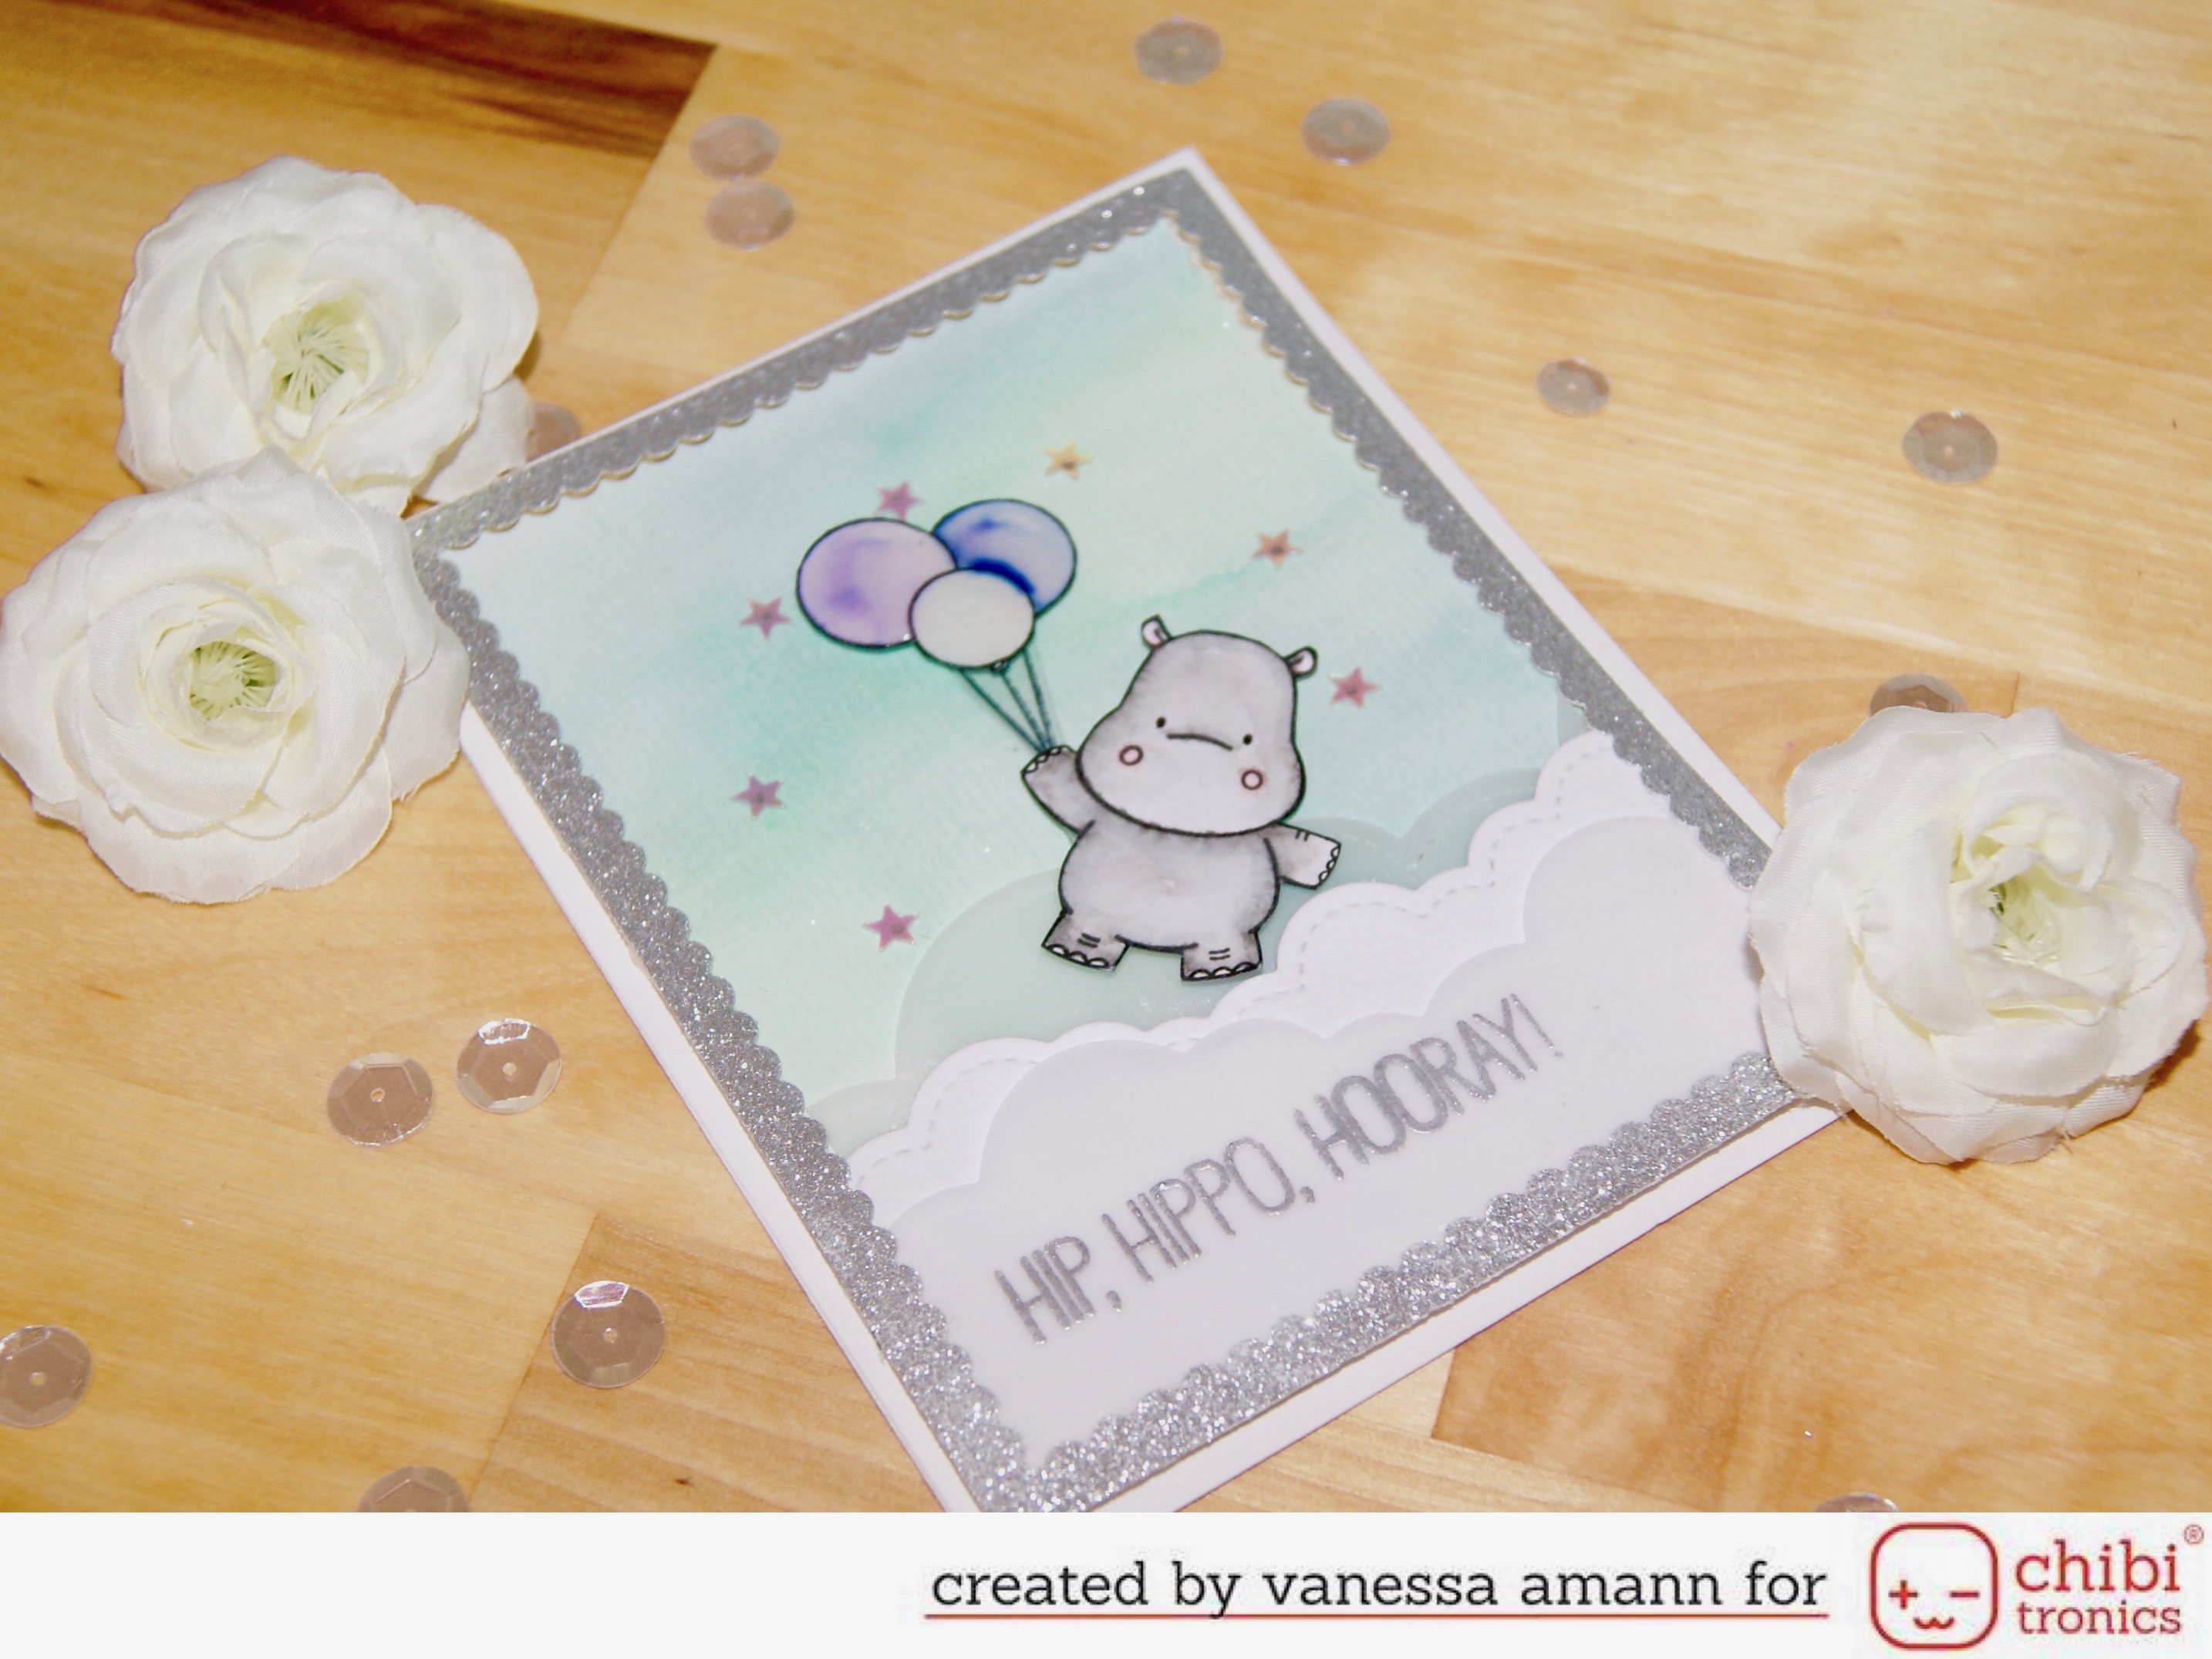
today I´m over at the Chibitronics blog to show you a flying hippo LED card. I had the idea in my mind to create a slider switch card like Eiko was doing lately. But I totally failed. Nevertheless I wanted to incourage you on continuing your projects and not throw them away. We spend so many hours (at least I do!) on a project, that I don´t want to loose this time. Sometime you just have to change ideas and the card will turn out beautifully. Nobody will ever know that it wasn´t planed like this. Just me and you ;)


I created a video for you on how I created my project. But you can find here a little instruction:
  • Stamp all my images mit Versafine black ink on watercoloring paper
  • Color images using Spectrum Noir Aqua Marker
  • Fuzzy cut images
  • Create the backgroun; I used Spectrum Noir Sparkle pens and aqua brush pen
  • Die cut the background, glitter frame and cloud borders
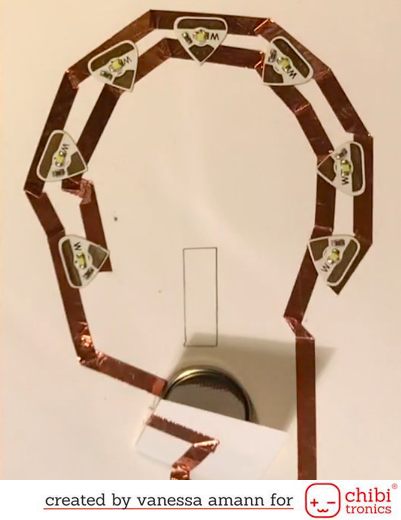
  • Create LED circuit (circuit picture below) on a card panel that is slightly bigger than the background
  • Stamp and emboss the sentiment on the cloud border
  • Assemble the card together; 1. One layer of foam tape all around the frame and tape the background on top 2. Another layer of foam tape on the bottom of the card 3. Adhire cloud borders 4. Two layers of foam tape on the glitter frame 5. Glue hippo and his balloons on the card
  • Add finishing touches like Glossy accents and iridescent stars (you could also use sequins)
  • Card is all finished ;)


I hope my instruction and my video could help you create this card. Feel free to change the places of the LED´s or change the scene. The card could be easily a love card when you arrange them into a heart shape.


All the supplies I´ve used are listend below. I wish you all a nice week and until the next time ;)


Merken
ChibitronicsStarter KitLabel OceanAcetateTim HoltzTonic Trimmer
ChibitronicsLED whiteLawn FawnPuffy Clouds Border DieVersafineOnyx Black
ChibitronicsCuppertapeLifestyle CraftersQuick Stick ToolVersamarkWatermark Ink
Create a SmileAcrylblöckeLittle Things by LucyStarry Nights Confetti My Favorite ThingsHappy Hippo
Foam Tape3MMy Favorite ThingsScallop Frame RectangleSimon Says StampSilver Embossing Powder
FoliaBonefolderNeenah SolarWhite Paper Ultra HeavySpectrum NoirSparkle pen Vintage Hues
FoliaWatercolor paperRangerMulti Matte MediumSpectrum NoirAqua Marker
FoliaBastelskalpellRangerGlossy AccentsIncadincadoEmbossing Bag
FoliaGlitzerkarton ClassicRangerPerfect PearlsStampin UpSchere
FoliaVellumSizzixBigShot

Light-up Unicorns

Hallo ihr Lieben,

lange nicht mehr gesehen. Ich weiß, aber heute bin ich zurück mit einer magischen Karte. Wort wörtlich ;) Ich habe eine Einhorn-Leuchte-Karte für euch. Hierzu habe ich die magical Unicorns von My Favorite Things verwendet und das LED System von Chibitronics. Dazu habe ich euch eine Video-Anleitung gemacht. Auf deutsch, mit englischen Untertitel, irgendwie wollte ich es so vielen wie möglich recht machen. Ich hoffe ihr könnt in meinem Video auch von meinen Fehlern lernen, und fühlt euch bestärkt eigene leuchte Karten zu basteln. Leider wird es auch noch eine kleine Weile dauern, bis es wieder was neues von mir gibt, da wir nächste Woche umziehen und mein Bastelzimmer quasi nicht mehr existent ist. Ich hoffe aber, dass ihr euch dafür noch mehr drauf freut wieder was von mir zu hören. Auf Instagram poste ich ab und an noch kleine Werke. Wenn ihr sie sehen wollt, dann stellt sicher, dass ihr mir folgt: @vanessa.amann

Hello friends, 

I know, long time no see. But today I´m back with a literally magical unicorn cards. The card is a unicorn-light up-card. I used the magical unicorns from My Favorite Things and the Chibitronics lightning system. I also created a video tutorial for you. This time it is a german one but with english subtitle. I hope to make it right for most of you. For the next time there will be also poor posting here, as we are moving next week and my craft room is unmounted at the moment. I can´t even find my phone holder to film my projects >.< But on Instagram I´m posting some of my colorings. In case you  want to see them, make sure to follow me: @vanessa.amann


Trotzdem hoffe ich, dass euch meine Karte und Videotutorial gefallen hat. Ich wünsche euch noch einen wundervollen Sonntag und bis zum nächsten Mal.

Nevertheless I hope you enjoyed my card and card making tutorial. And until the next time I hope you have a wonderful day.


Batterie Batterie Folia Bonefolder Ranger Multi Matte Medium
Chibitronics  Starter Kit Folia Acrylblöcke Ranger Glossy Accents
Chibitronics  LED white Folia Schere Scotch 3M Tape Glider
Chibitronics  Cuppertape Incadincado Embossing Bag Simon Says Stamp Fog Ink
Copic Marker Copic Marker Kuretek Wink of Stella Sizzix BigShot
Create a Smile Acrylblöcke Label Ocean Acetate Tim Holtz Ink Blending Tool
Darice Storage Solution Lawn Fawn Puffy Clouds Border Die Tim Holtz Spun Sugar
EK Success Powder Tool Lifestyle Crafters Quick Stick Tool Tim Holtz Shaded Lilac
Foam Tape 3M Little Things by Lucy Starry Nights Confetti  Tim Holtz Tonic Trimmer
My Sweet Petunia MISTI Tool Little Things by Lucy I Love You Confetti Versamark Watermark Ink
Memento Tuxedo Black WOW Embossing Opaque White Embossing Powder

Otterly Great Birthday!

Hallo Freunde des bastelns, 

heute bin ich zurück mit dieser simplen und einfachen Karte. Im Moment bin ich total auf "Massenproduktion" eingestimmt. Ich habe mir angewöhnt von jeder Karte direkt ein paar mehr zu machen. Vor allem Baby- und Geburtstagskarten kann man nie genug haben. Gerade mit den Zig Real Color Brush Pens und dem Bristolpapier von Folia geht das sehr schnell. Und ausschneiden lasse ich meine Figürchen von meinem Silhouette Portrait. So kann ich in der Zeit weiter basteln, während die Maschine schneidet. 

Hello crafty friends, 

today I´m back with this quick and easy card. At the moment I´m in the mood of mass-producing cards. I love to color with my Zig Real Color Brush Pens on Bristol Smooth card stock. It goes so quickly and turns out beautifully. All the images were cut with my Silhouette Portrait, so that it goes faster and I don´t need to spend time on fuzzy cutting. 


Für den Hintergrund habe ich ebenfalls das Bristolpapier verwendet und meine Distress inks. Mit dem Papier wird das Wischen viel leichter und geht viel schneller, als auf normalem Papier. Ich habe meine Scallop Dies für das Schüttelfenster verwendet. Den Rahmen für das Schüttelfenster habe ich mit Abstandsklebeband gemacht und die Folie für das Schüttelfenster ist einfache Overheadfolie. Gefüllt habe ich das Fenster mit ein paar Wellen aus Transparentpapier und durchsichtigen Pailletten und Perlen von Pretty Pink Posh, sowie ein paar Fische aus dem selben Stempelset.  

I ink colored the background with Distress Inks on the same Bristol Smooth card stock. The one I´ve used is my favorite from Folia. I used my scallop frame dies to create my shaker window. The shaker frame I created out of fun foam and a piece of acetate. I filled the shaker window with some vellum waves and clear sequins and beads from Pretty Pink Posh and some windows are filled with fishes from the same stamp set. 


Ich hoffe euch haben meine Karten gefallen und bis zum nächsten Mal wünsche ich euch noch einen schönen Freitag!

I hope you liked my card and until the next time I hope you have a wonderful Friyay!


Lawn Fawn Ocean Wave Border Die My Favorite Things  Stitched Rectangle Scallop Frame Tim Holtz Chipped Saphire
EK Success Powder Tool My Sweet Petunia MISTI Tool Tim Holtz Broken China
Folia Bonefolder Neenah Solar White Paper Ultra Heavy Tim Holtz Tonic Trimmer
Folia Stempelkissen Pretty Pink posh Sparkling Clear 4mm Tombow Mono Multi 
Folia Vellum Pretty Pink posh Sparkling Clear 6mm Versamark Watermark Ink
Folia Doppelseitiges Klebeband 5mm Ranger Multi Matte Medium WOW Embossing Opaque White Embossing Powder
Folia Bistrolpapier Ranger Glossy Accents Lifestyle Crafters Quick Stick Tool
Kuretek Wink of Stella Scotch 3M Tape Glider My Favorite Things Scallop Frame Rectangle
Kuretek Zig Real Color Brush Pens Silhouette Portrait Plotter My Favorite Things Otterly Love You
Label Ocean Acetate Sizzix BigShot Tim Holtz Ink Blending Tool
Tim Holtz Tumbled Glass Ink


Video-Sonntag: Glitzer Regenbogen

Hallo ihr Lieben,

heute ist Video-Sonntag angesagt. Bis vor ein paar Tagen wusste ich nicht, was ich heute machen soll. Dann habe ich die Woche ein mini Video auf Instagram gepostet und ich habe ein paar Anfragen bekommen ein Video dazu zu machen. Gesagt getan- hier ist es :)

Hello everybody, 

welcome back to another video Sunday. Until few days ago I didn't know what to share with you. Then I posted a card with a glittery rainbow and some of you asked how I did it. So here it is.  


Hier ist also das gute Stück, um das es in dem Video geht. Genauer gesagt ging es aber ursprünglich nur um den Regenbogen. Irgendwie habe ich dann aber einen passenden Spruch gesucht und hatte nur einen mit "Wishing you all rainbows, unicorns and glitter". Er hatte auch perfekt gepasst, nur hatte ich eben kein Einhorn. Naja, auch dieses Problem lies sich dann lösen ;) 

My first cards I´ve made were without unicorns. But I wanted to use other sentiments and I found this one from My Favorite Things. There were only one problem. The card did had an unicorn. So I decided to color one in and put it on the card. You can never have to much unicorn and glitter cards :D


Leider ist es im Video und auf Fotos immer so schwer den Glitzer-Schimmer einzufangen. In Echt ist er einfach nur unbeschreiblich schön.
Ich hoffe euch hat meine Glitzer-Regenbogen Karte gefallen und wir sehen uns ganz bald wieder :) Ich wünsche euch jedenfalls noch einen schönen Sonntag.

It is so hard to capture the great shine from the glitter. It is always hard in videos and pictures to see. In real it is so beautiful. I hope you liked my glitter rainbow card and we will see us later. Iw wish you all a happy Sunday :)


Material:

Copic Marker Copic Marker
Create a Smile Weil du toll bist
Foam Tape 3M
Folia Bonefolder
Folia Fun Foam/ Moosgummi
Folia Stempelkissen
Folia Acrylblöcke
Folia Schere
Folia  Glitzer
Folia  Sterne Silber
Kuretek Wink of Stella
Lawn Fawn Puffy Clouds Border Die
Lifestyle Crafters Quick Stick Tool
My Favorite Things  Stitched Rectangle Scallop Frame
My Favorite Things  Blueprints 27
My Favorite Things  Magical Unicorns
My Sweet Petunia MISTI Tool
Neenah Solar White Paper Ultra Heavy
Ranger Multi Matte Medium
Scotch 3M Tape Glider


Welcome Babys

Hallo und Willkommen zurück,

gestern habe ich mich mit zwei super netten und süßen Damen getroffen um ein bisschen zu basteln. Da ich ja schon lange nicht mehr an Wettbewerben teilgenommen habe war mein oberstes Gebot Wettbewerbskarten zu basteln und gleichzeitig meine neuen gekauften Sachen zu testen :)

Hello and welcome back :)

yesterday I met myself with two super sweet and kind people to craft a bit. Since I haven't played a challenge for a long time my first rule for yesterday was to craft only challenge cards and I also tried to use all my new crafting supplies.


Wie ihr sicherlich sehen könnt möchte ich bei der My Favorite Things Sketch Challenge #281. Als ich zum 1. Mal diese super süßen Hasen gesehen habe wusste ich direkt, dass ich sie brauche. Allerdings wollte ich keine "Freundeskarte" basteln, sondern ich wollte Babykarten basteln. Außerdem haben wir ein paar Schwangere in unserem Bekanntenkreis, von daher weiß ich, dass ich diese Karten bald benötigen werde :)

As you can see I´m going here for the My Favorite Things Sketch Challenge #281. I´ve got this super cute bunnies and when I saw them for the first time I knew I had to use them. But I didn't wanted to use them for a kind of friends card, I wanted to use them for a Baby card. I think they are cuteness overload! And also I have a lot of pregnant friends here around and I know I´ll need this cards really soon :) 


Und wie immer hoffe ich, dass euch mein Beitrag für heute gefallen hat und wir sehen uns beim nächsten Mal (morgen!) wieder ;)

I hope you liked my challenge entry and I hope we will see us too (tomorrow) for my next card I did for a challenge.


Versamark Watermark Ink
Tim Holzt Shaded Lilac
Tim Holtz Ink Blending Tool
Scotch 3M Tape Glider
Ranger Multi Matte Medium
My Sweet Petunia MISTI Tool
My Favorite Things  Snuggle Bunnies
My Favorite Things  Jumbo peek a boo dies
My Favorite Things  Blueprints 25
Memento Tuxedo Black
Little Things by Lucy Starry Nights Confetti 
Little Things by Lucy I Love You Confetti
Lifestyle Crafters Quick Stick Tool
Kuretek Wink of Stella
Incadincado Embossing Bag
Folia Acrylblöcke
Foam Tape 3M
Lawn Fawn Puffy Clouds Border Die


From meow to you ;)

Hallo ihr Lieben,

heute bin ich endlich mal wieder mit einer Challenge-Karte zurück. Dummerweise habe Ich so lange gebraucht bis ich sie posten konnte, dass die Challenge wieder herum ist -.-' Oh man... in letzter Zeit schaffe ich es nicht mehr. Naja, aber auch so mache zu mindestens Karten und das ist die Hauptsache. Außerdem wollte ich mein neues Set von My Favorite Things verwenden. 


Eigentlich mag ich ja keine Sets mit Haustieren. Ich weiß auch nicht. Wir hatten nie selber welche und gegen die meisten Tiere bin ich sowieso allergisch. Gegen Katzen sogar am aller meisten, aber dieses Set hat es mir total angetan. Vielleicht wegen der kleinen Peek-a-boo Katze :D Ich liebe sie.


Hier könnt ihr noch das Innere der Karte betrachten. ich finde es einfach nur zuckersüß. Ich hoffe euch hat diese kleine Karte gefallen. Ich war schon ein bisschen traurig, dass ich es verpasst habe sie "einzusenden", aber mir gefällt sie trotzdem und ich wollte sie euch nicht vorenthalten.


Material: folgt später ...